As an RW Team, our hearts are heavy to see our friends increasingly impacted by these precautionary measures.
But we hope to provide support and insight on how to handle these types of Events through your Orders in RW.
We’re finding most event rental pros are facing two common types of event changes: Postponements & Cancellations
First, let’s talk about Postponements.
POSTPONEMENTS
If you’d like to give the Client the opportunity to postpone their Order until a later date, here’s what to do.
STEP 1: CHANGE ORDER STATUS
Change the status of the Order back to Proposal.
STEP 2: UPDATE ORDER DATES
Change the Order to a date in the future. If there hasn’t been a new date set, change the Event Date to the same date but in the year 2023 (i.e. 3/20/21 would be changed to 3/20/23). Be sure to do the same for the Off-the-Shelf & Restock Times.
If there are conflicts when saving the Order, adjust the Off-the-Shelf & Restock Times to a date further in the future.
If you have your Proposals set to Auto-Cancel upon expiration, you’ll also need to change the Expiration Date to a date in the very distant future (i.e. 01/01/2026).
**OPTIONAL STEP 3: UPDATE FINAL BALANCE DUE DATE
Depending on your policy, you may need to also update the Final Balance Due Date should the Event Date be postponed.
We’ve found that many event rental professionals are asking their Clients to keep their original payment schedule to keep consistent cash flow.
But should you decide to move the Final Balance Due Date with the Event Date, you’ll need to manually update the Final Balance Due Date within the Order.

You may also consider unselecting Autopay for the Order if there is not a set date yet.
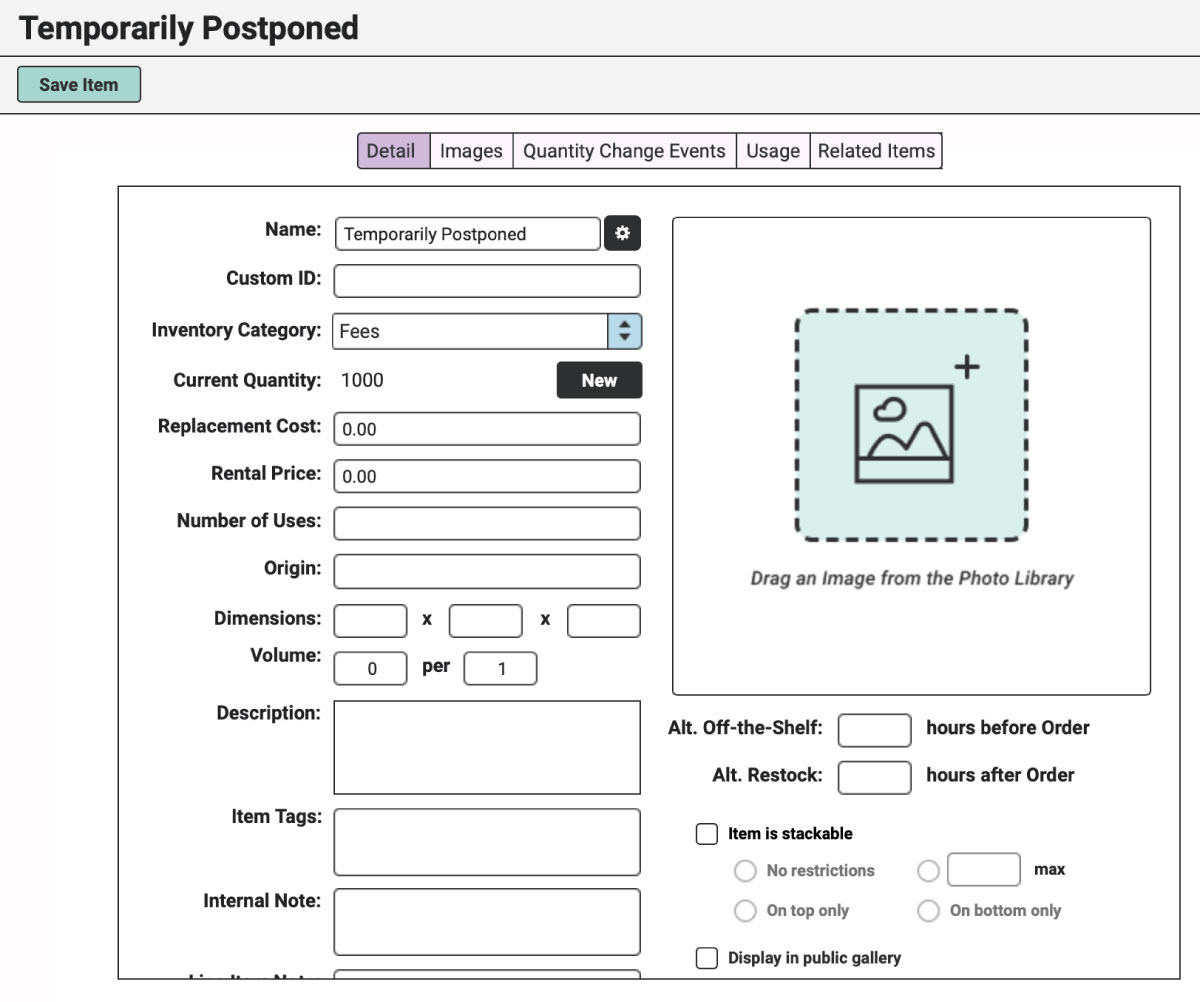
STEP 4: CREATE POSTPONEMENT ITEM
Navigate to the “Items” icon in the upper left corner of your browser window.
Within your “Fees” category, create a new Item.
Name the Item “Temporarily Postponed.”
Leave the Rental Price at $0.00.
Add a Quantity Change Event with an Acquisition Date in the past (i.e. 01/01/2020) and a quantity of at least 1000.
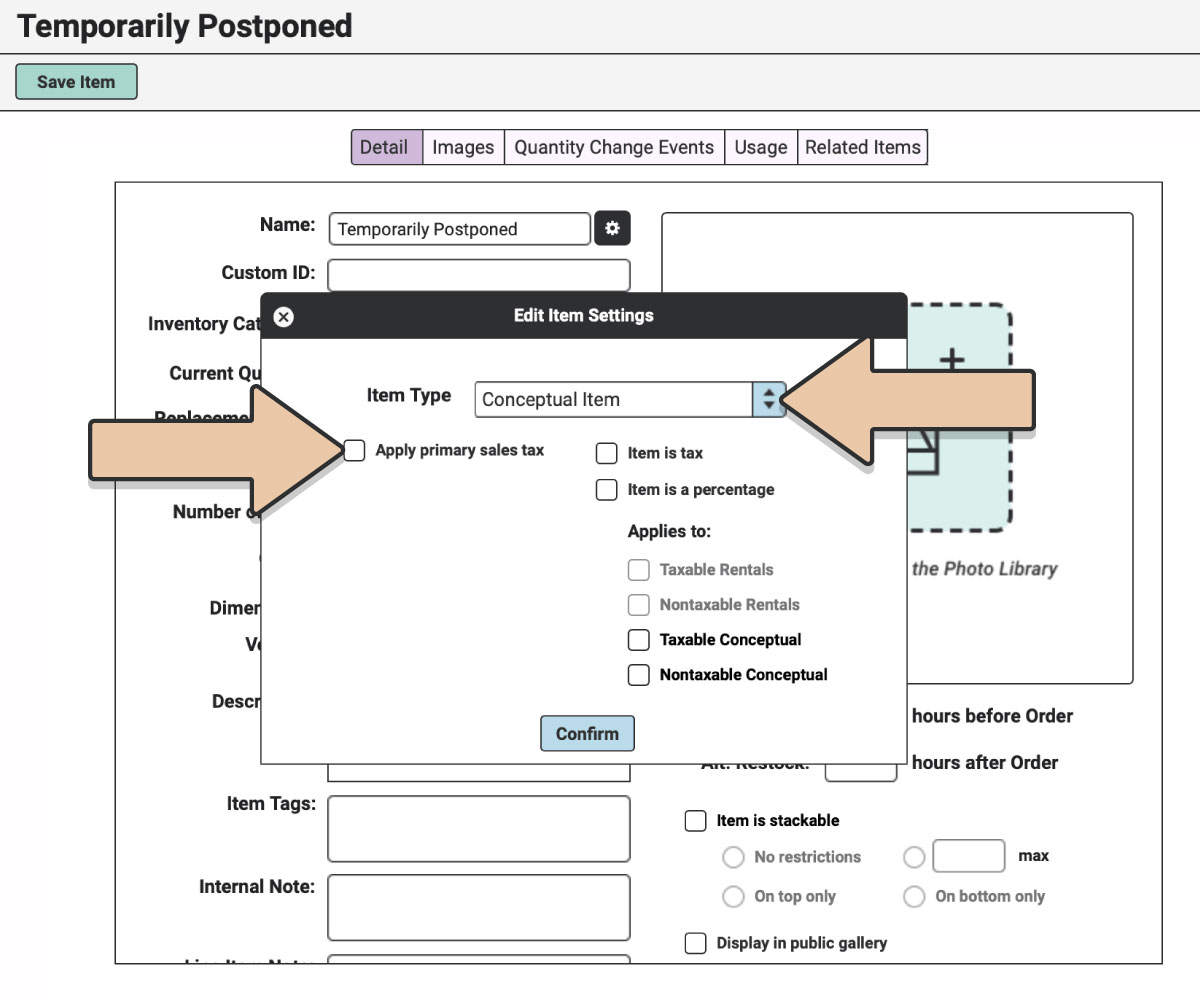
Within “Item Settings” (settings wheel next to Item Name), be sure “Conceptual Item” is selected for Item Type and untick “Apply primary sales tax.”
STEP 5: ADD POSTPONEMENT ITEM TO ORDERS
Once created, add the “Temporarily Postponed” Item to all Orders that are being postponed. This will allow you to easily identify and search which Orders have been postponed.
After you’ve added the Item to these Orders, use the “Usage” tab within the “Temporarily Postponed” Item to view which specific Orders it’s been added to.
STEP 6: CONFIRM THE POSTPONED ORDER
Once the Client is ready to Confirm the future Order:
- Set the correct Event Dates and Off-the-Shelf & Restock Times to ensure availability
- Remove the “Temporarily Postponed” Item
- Change the Proposal Expiration Date to the date you need the Client to confirm by
- **Don’t forget to manually update the Final Balance Due Date through the Payments tab under “Update Payments Options” if this is part of your policy
When the Proposal is all set, if you’ve enabled Integrated Credit Card Processing, send the Client the Payment Link to sign in agreement (again) and pay their remaining deposit amount or balance.
Taking the above steps for postponed events will keep the Orders intact, keep your Confirmed Orders current, and limit conflict of Items.
See Transferring Payments below for more information on crediting future Orders through Promotional Credits.
CANCELLATIONS
Now if you have Events that will not be postponed but will be completely Cancelled, these types of Orders can be handled like any other Confirmed Order that becomes Cancelled.
In short, here’s how to Cancel a Confirmed Order:
- Remove all Line Items from the Order, to free them up to be rented on another Order.
- Add a “Cancellation Fee” line item to the Order.
- Change the Unit Price of the “Cancellation Fee” to the amount of the Non-Refundable Deposit you’re keeping.
- Refund whatever amount needs to be refunded (if any) so that the Order Balance equals $0.00. Here’s how to Refund Orders in RW.
- The Order status will become Completed once the Event Date has passed.
Handling Cancellations this way will ensure you have no double bookings, will update your Stripe Account, and will help you keep track of Cancelled Orders.
Additionally, if the Client had selected Autopay, following the above steps to bring the balance to $0.00 will make sure they are not charged automatically on the final balance due date.
TRANSFERRING PAYMENTS
Within RW Elephant, payments are connected to the specific Order it was entered on. If you’d like to credit a previous payment toward the balance of another Order, consider using a Promotional Credit.
Think of Promotional Credits like gift cards.

STEP 1
Leave the original payment as is on the original Order.
STEP 2
Provide the Client with a receipt of the Credit (physical gift card, an email agreement, etc.).
STEP 3
When the Client is ready to apply their Credit, enter a new payment record as a Promotional Credit on the new Order.
In the Reference field, include a note about what the Credit is (i.e. Credit from Order 1234, Postponement Credit, etc.).
If you have any questions at all, please don’t hesitate to reach out. Our Client Success team is eager to support in any way at help@rwelephant.com.