In order to account for changing Inventory quantities over time, RW Elephant tracks quantity using Quantity Change Events. Whenever you add or remove inventory, you’ll need to do so with a New Quantity Change Event.
You’ll enter an Item’s very first Quantity Change Event as you add any new Item. The Acquisition Date and Quantity together make up that first Quantity Change Event.
Adding Items
In the future, if you acquire more of the same Item or get rid of some or all of it, you’ll need to create another Quantity Change Event.
Do this by navigating to the “Items” icon in the upper left corner of your browser window.
Select the applicable Category and then the particular Item you need to modify.
Click on the green “Edit Item” button.
Click on the black “New” button next to the Current Quantity.
In the pop-up window, fill in the fields to create the Quantity Change Event.
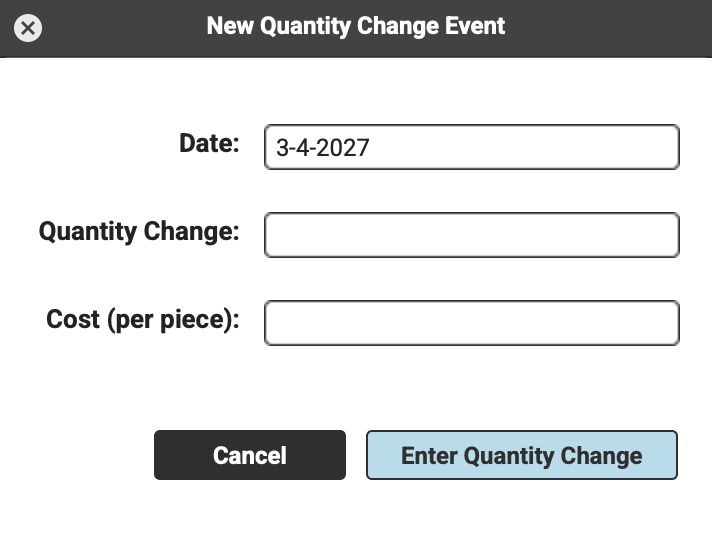
To add Items, enter the Acquisition Date*, Quantity Acquired (should be a positive integer), and Cost per piece.
*Keep in mind that the Acquisition Date can be in the past, present, or future. If you purchased the Item 2 months ago but didn’t get around to adding it to RW Elephant until now, use the real date in the past.
If you’ve ordered something but it won’t actually be available to rent until 3 weeks from today, use 3 weeks from today for your Acquisition Date. That way, RW Elephant will allow you to start putting the Item on future Orders even before it arrives at your warehouse.
Also note, the Acquisition Date for the Item must be BEFORE the Off-the-Shelf time for any Orders you’d like to add it to.
Click the blue “Enter Quantity Change” button. The Quantity will then be increased from the Acquisition Date moving forward.
Removing Items
There are 4 ways to remove Items from your RW Elephant Account:
- Use a new Quantity Change Event
- Delete or Edit an existing Quantity Change Event
- Use a Sale Order
- Use RW’s Damaged & Missing Item Workflow
1. Add a New Quantity Change Event
Use a Quantity Change Event to remove Items in these circumstances:
- Item is damaged beyond repair
- Item is missing
- Item must be retired (but isn’t being sold)
If you need to remove an Item for one of the above reasons, select the Item and click the green “Edit Item” button.
Next to the Current Quantity, click the “New” button.
In the Quantity Change Event window that appears, enter the date the Items were/will be removed, the amount that were removed (should be a negative integer). You won’t need to include a Cost when removing Items. You can use a Quantity Change Event to remove all or just some of the Quantity that you own.
While it may seem a little complicated to create this whole new event to get rid of Items, this process is necessary to keep track of what you have when you have it. So, if you need to remove an Item that was rented on an Order last week, we don’t want the whole Item to just disappear. Instead, we want to keep a record that you had it but now you don’t.
2. Editing and Deleting Quantity Change Events
If you’ve made a mistake when entering a Quantity Change Event, you may Delete or Edit it. You should only ever use the Delete function if you want to entirely delete any record of the Item’s existence. The Editing function should only be used to fix a mistake.
To Delete or Edit a Quantity Change Event, select the Item you need to modify.
Click on the “Quantity Change Events” tab for the Item.
Within the table, select the Quantity Change Event you’d like to Delete or Edit.
Double click on the Date, Quantity, or Cost and type the correct number. If you want to delete the Quantity Change Event entirely, enter “0” for the quantity or use the “-” button in the bottom left corner of the table.
If you’ve used the Item on any Order (Proposal, Confirmed, Completed, Cancelled, Sale, Damaged, or Wishlist), you will not be able to Delete the Quantity Change Event or change the Quantity to lower than the amount used on past Orders.
Again, this method should only be used if you’ve made a mistake in your entry. If you want to remove an Item that is damaged beyond repair, needs to be retired, or is missing, use a New Quantity Change Event (above).
3. Sale Orders
To sell an Item, use a Sale Order.
4. Damaged & Missing Item Workflow
If an Item is damaged but not repairable or if the Item is missing, use the Damaged & Missing Item Workflow to streamline removing the Item from inventory as well as charging (or not charging) your customer a fee all through one simple process.
Quantity Change Event Notes
After a Quantity Change Event has been entered, you can add a Note to specify the context of the Quantity Change Event.
Within the “Quantity Change Events” tab of the Item, click the green “Edit Item” button. Select the Quantity Change Event in question, then double-click into the “Note” field and type away.
RW will automatically add a Quantity Change Event Note when the change is made through a Sale Order or through the Damaged & Missing Item Workflow.
Also see: