Choose to start either from a desktop Order or from RW Elephant’s iOS App companion tool.
When starting from the iOS App, the User will simply report the incident. The reported Item(s) will then be managed from a desktop computer after the event.
Starting from the desktop will skip the reporting step and jump straight to managing.
For this tutorial, we’ll start with the RW Elephant iOS App.
From RW iOS APP – Delivery Checklists
Log in to the RW Elephant iOS App.
Head to “Deliveries” and select an Order.
Choose the Delivery Checklist you wish to complete.
From the Checklist, scroll down to the Item in question.
Slide your finger along the Item to the left. This will expose the Damaged and Missing workflow options.

Make the appropriate selection.
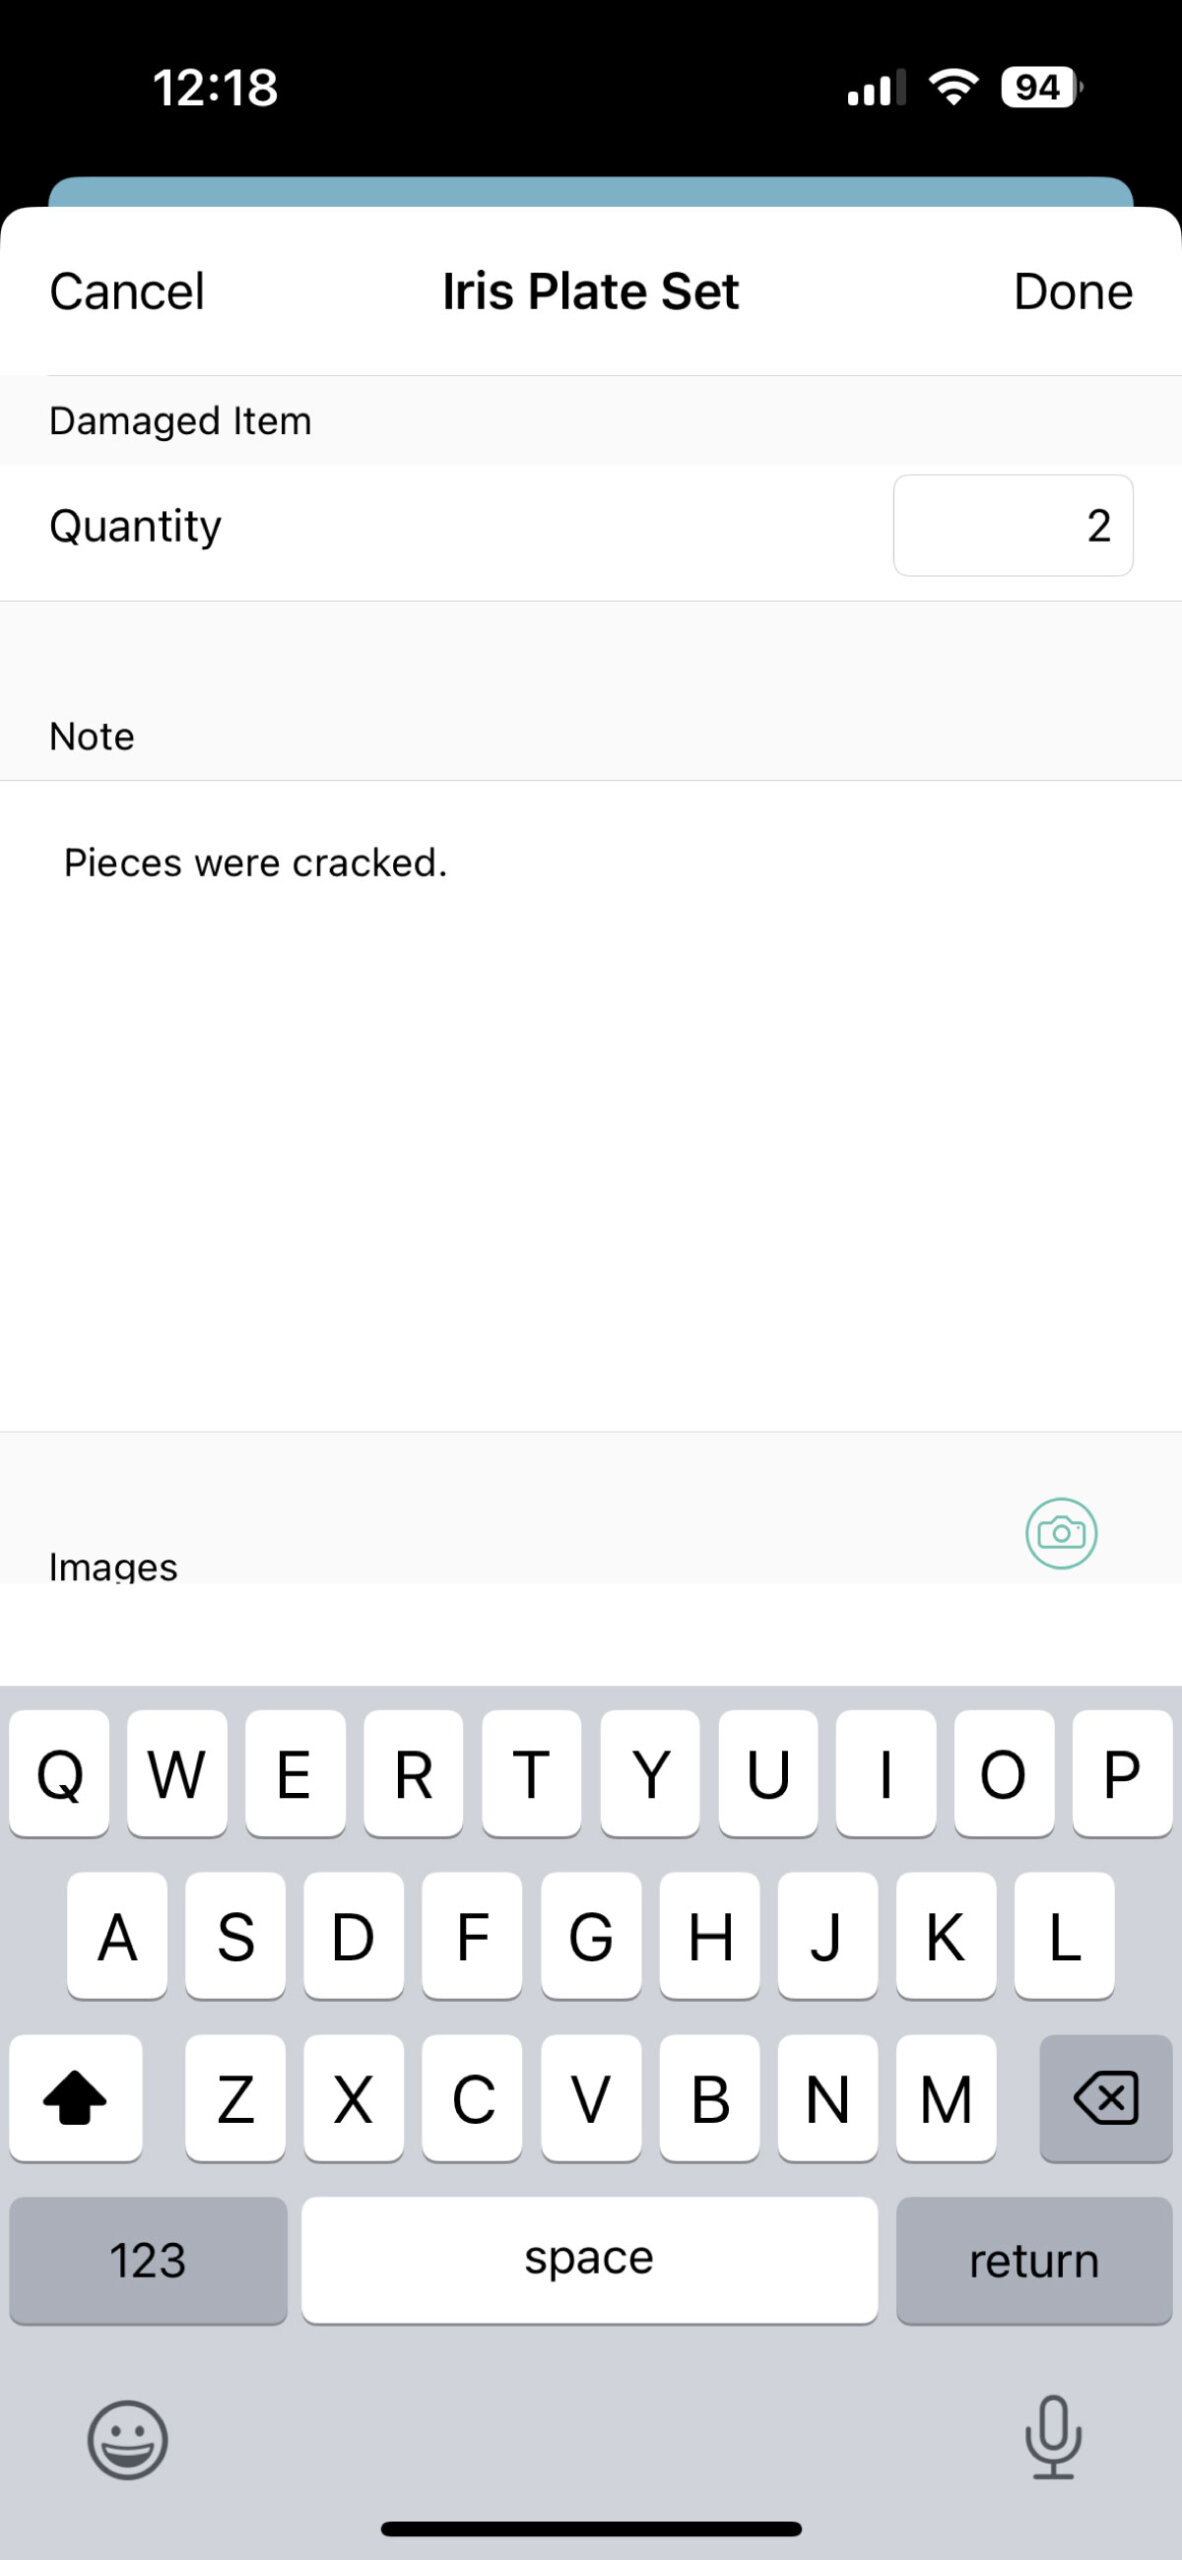
This will open a new view for entering details about the Item.
Choose the Quantity of the Item that was Damaged or Missing.
Write any notes about the incident. Take photos of damages onsite.
Repeat the process for any other Items on the Checklist. Once the Checklist is completed (i.e. all Items are checked off), a Damage Alert email will be sent to the designated team member(s) reporting all of the Damaged and Missing Items.
Reporting Damaged & Missing Items through the iOS App simply reports that there was an incident. Office staff will review and manage the Item from a desktop computer after the Order is returned and inspected.
Editing Damaged & Missing Item iOS App Reports
Should you need to edit or delete a Damage or Missing Item Report in the iOS App, select the broken glass icon in the upper right corner of the Checklist. This icon will only appear once an Item has been reported and checked off.
From here, you can see all of the Items reported from this Checklist with either a Damage or Missing icon next to it.
To delete a reported Item, simply swipe from right to left across the Item. A red “Delete” button will appear to the right of the Item. Select the “Delete” button.
If you’d like to edit a reported Item, simply select it from the list and edit your entries.
Any edits made here will update in real time in the “Pending Items” section that we’ll get to in a moment.
Now that the Items have been reported, let’s walk through how to manage these Items post-event.
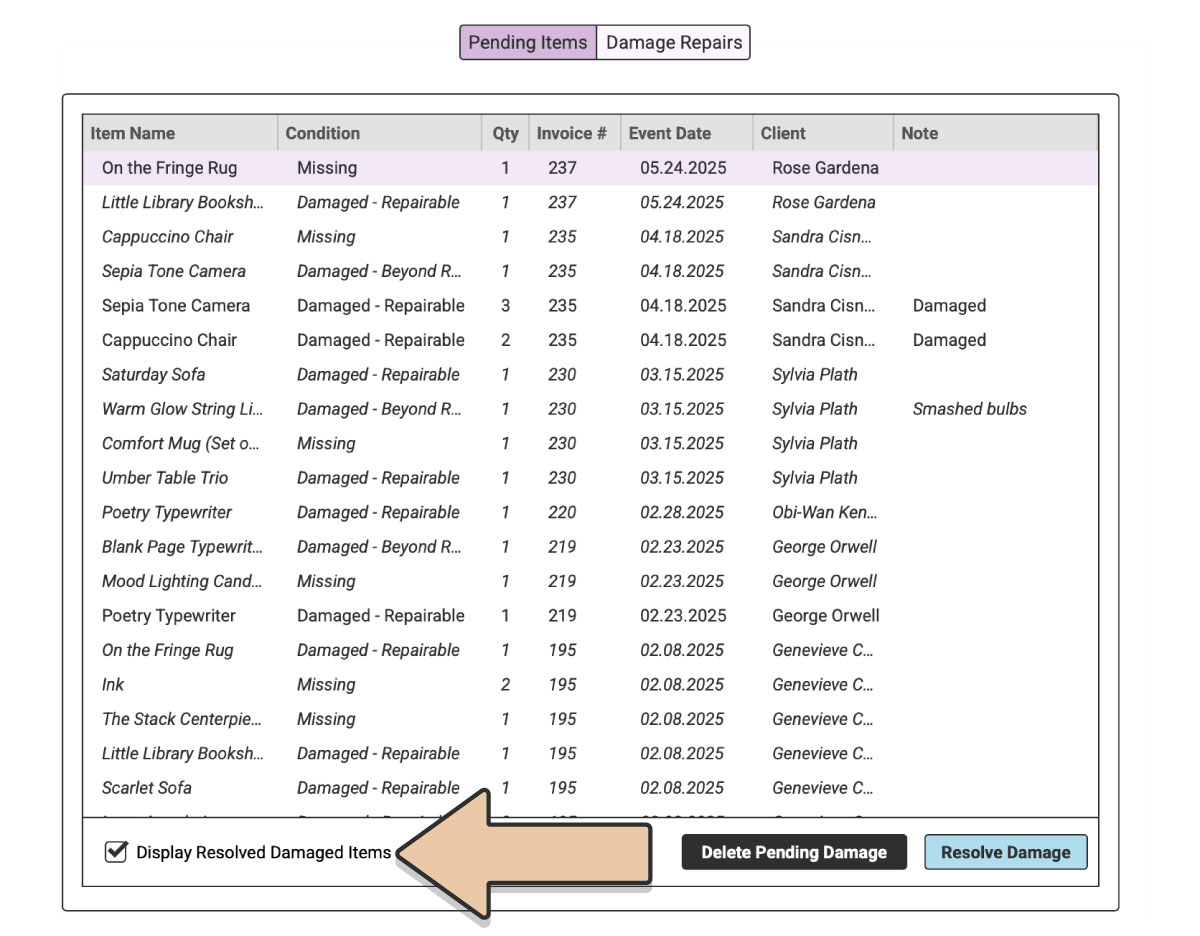
Manage Pending Items
Head to the “Planning” icon in the upper left corner of your browser window.
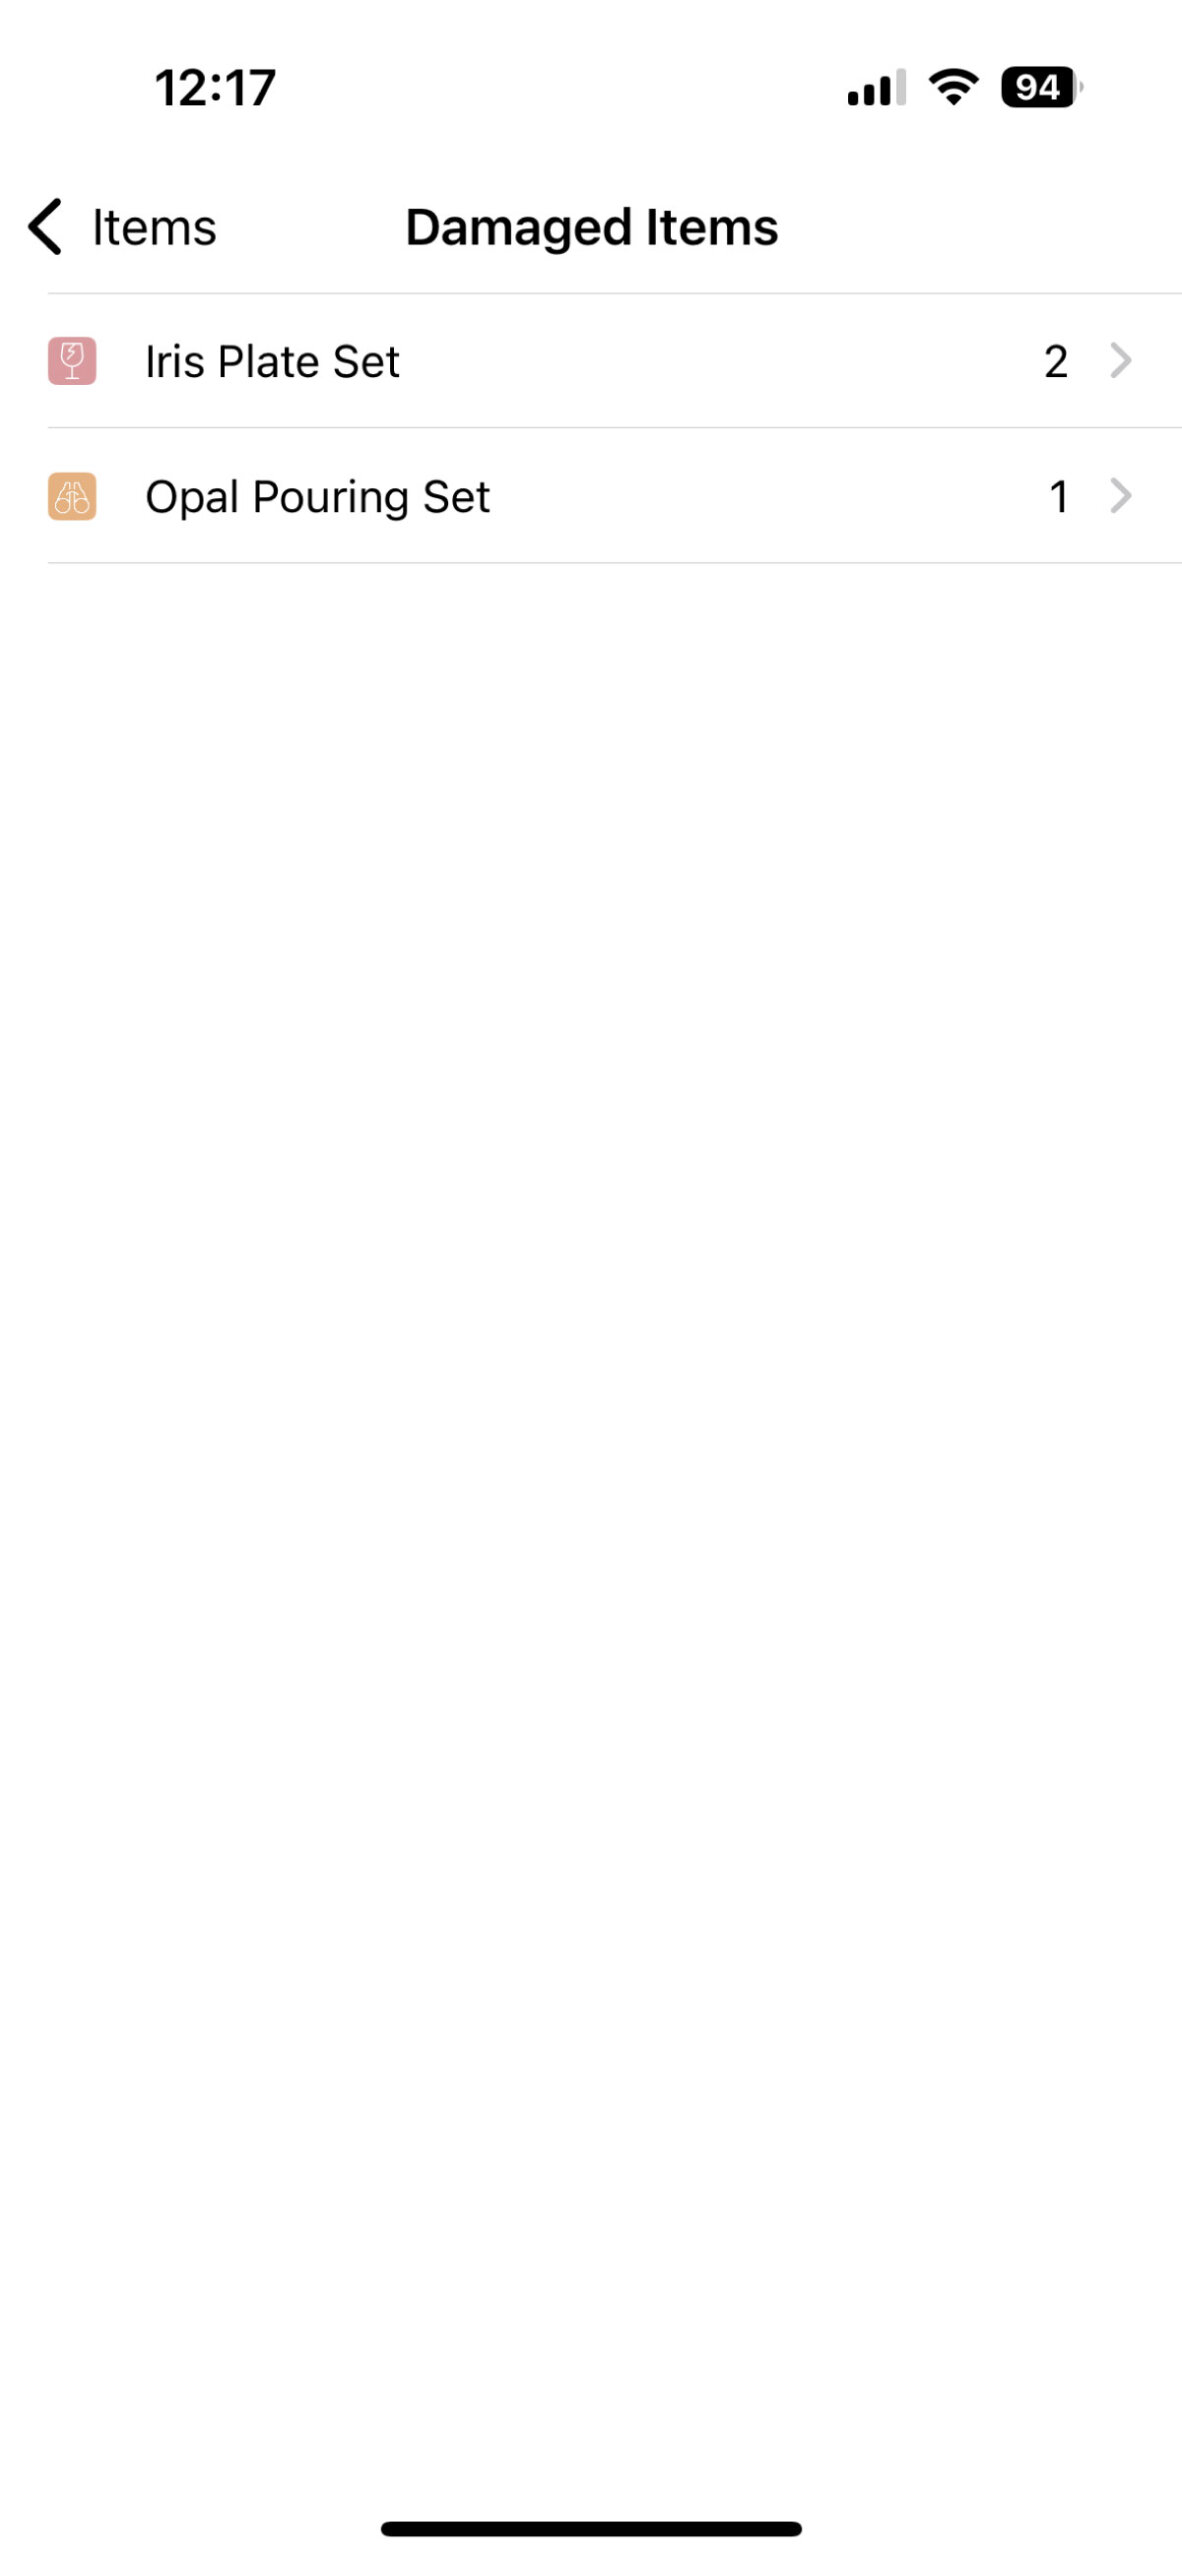
Select “Damaged Items” from the column on the left.
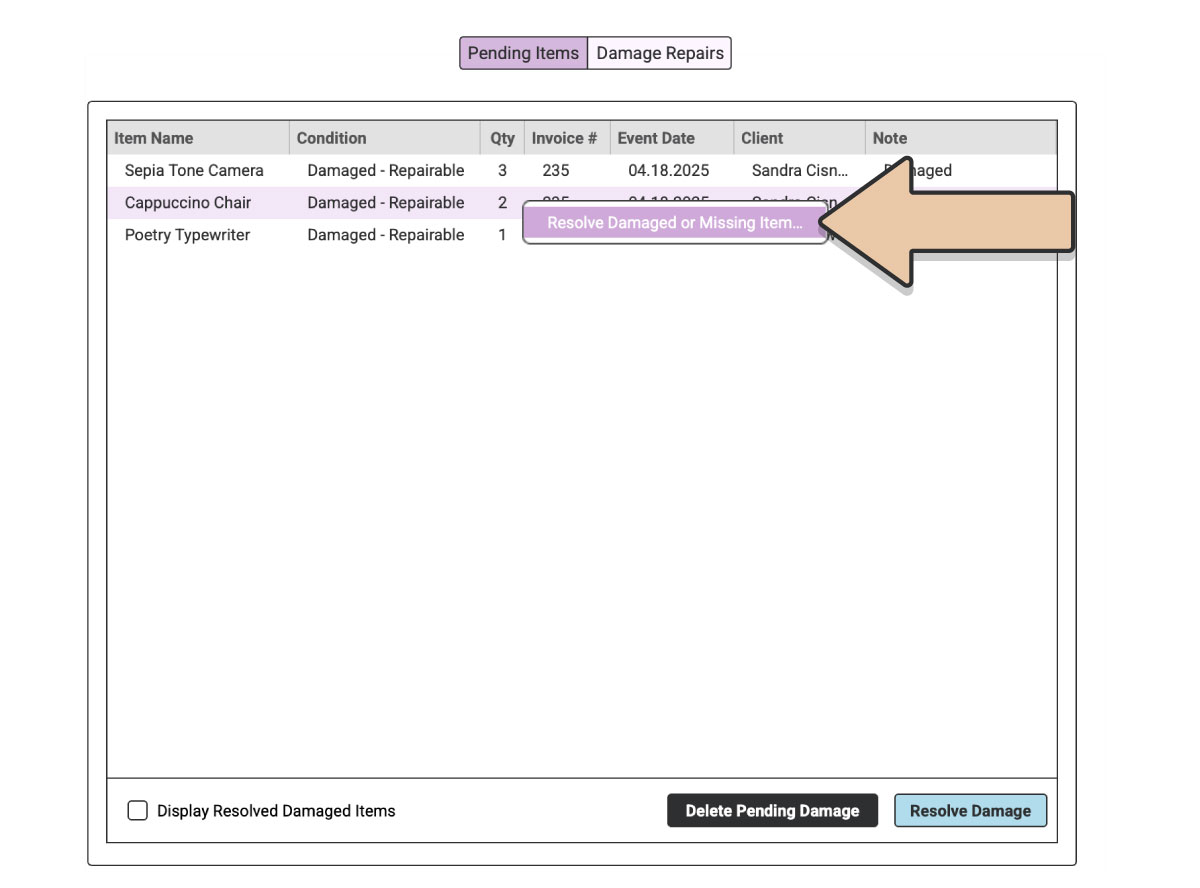
Here you’ll find all “Pending Items” that were submitted through the RW iOS App.
To manage an Item, either select it in the list and click the “Resolve Damage” button in the bottom right corner
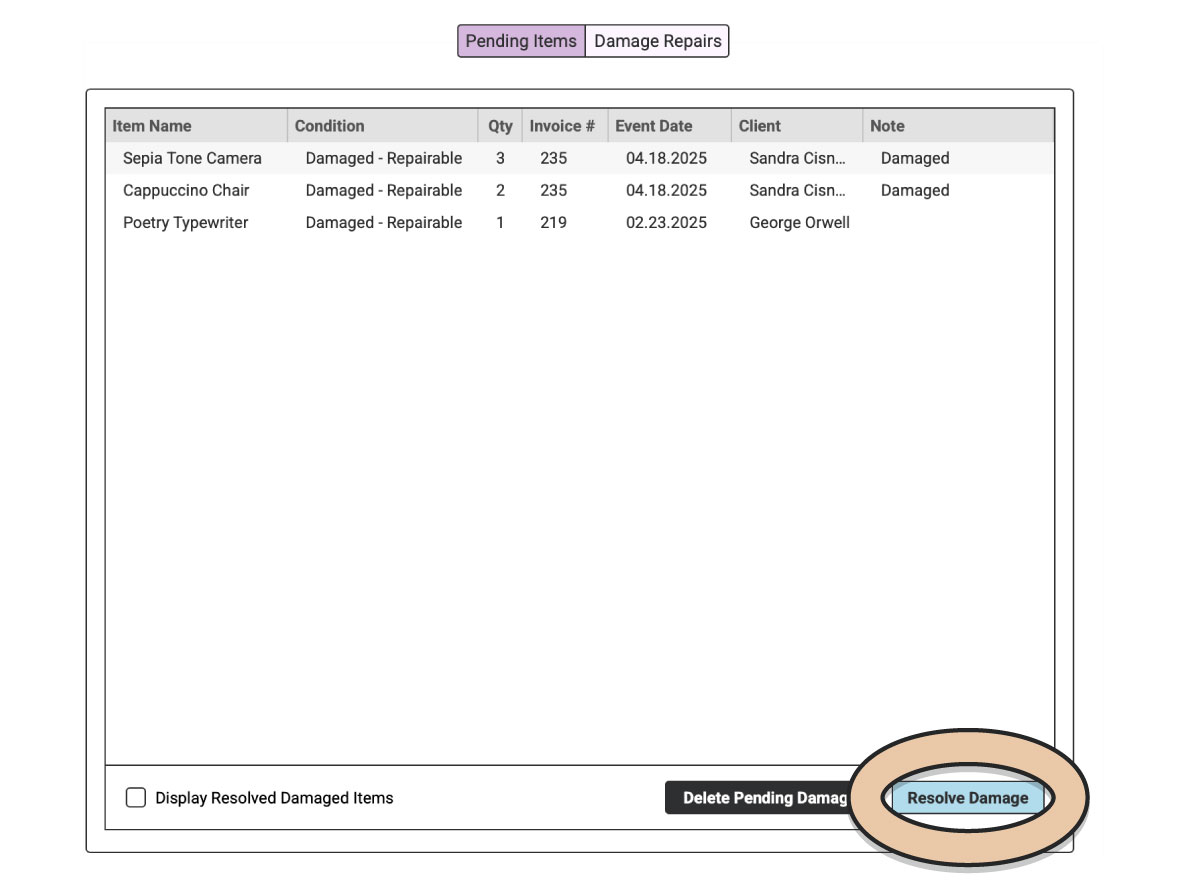
Or select the Item and right-click on it. Select “Resolve Damaged or Missing Item…”
In the pop-up, first select the Item’s Condition. There are three options:
- Damaged – Repairable
- Damaged – Beyond Repair
- Missing
Enter the Item Quantity that is in this condition. If multiple of the same Item are in varying conditions (e.g. 1 Damaged – Repairable and 2 Missing), you’ll want to repeat the process for each condition type.
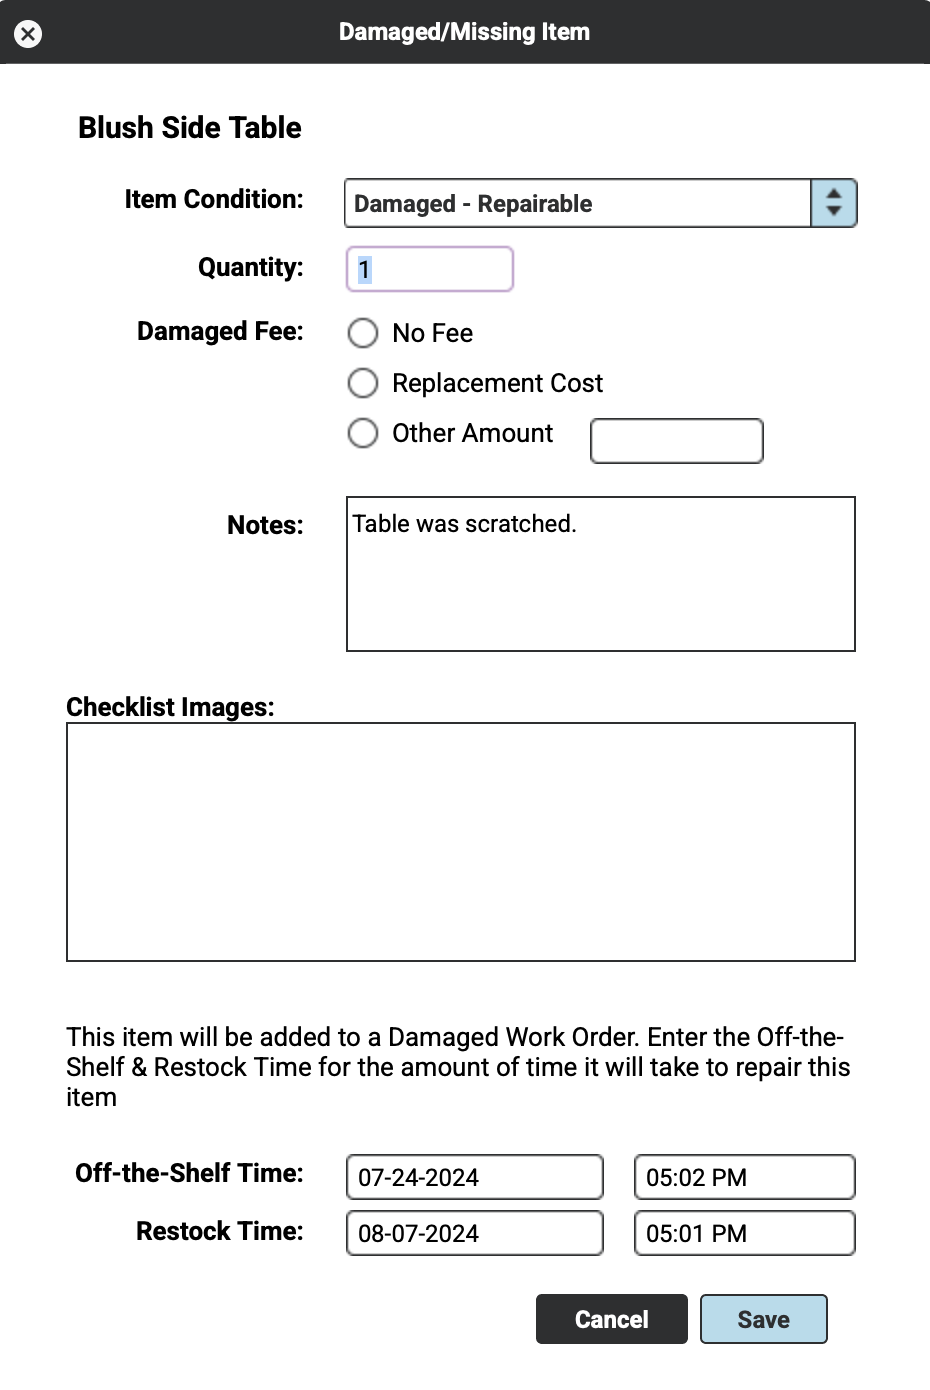
Choose if you will be passing along a fee to your customer or not.
Select “No fee” if you’ll be eating the cost (i.e. if you already charge a Damage Waiver, bake it into your pricing, etc.). Select “Replacement Cost” if you have a Replacement Cost entered for the Item and this is the exact amount you’d like to pass on to the customer. Or enter a specific fee amount in “Other Amount.”
Any notes entered by the Delivery Crew will appear under Notes. Enter any other notes you want to remember about the Damaged or Missing Item.
Images taken within the iOS App when the Item was reported will appear under “Checklist Images.” Double-click on the Image to enlarge it in a new tab.
The Item Condition you chose will determine what RW Elephant does next.
Damaged – Repairable
An Item that can be repaired will be added to a Damaged Work Order, which will pull it out of Inventory while it is being restored.
In the pop-up, enter the Off-the-Shelf and Restock Time of the Damaged Order. This is the length of time that the Item will be out of commission. The Off-the-Shelf Time will default to 1 minute after the Restock Time of the Order the Item was damaged on. The Restock will default to two weeks later. But feel free to adjust this to a realistic time frame.
Click the blue “Save” button. The Item will move from “Pending Items” to “Damage Repairs.”
If there is a conflict with the Item, you’ll receive an error message stating the Item could not be added to the Line Items of the Damaged Order. To resolve the conflict, head back to the Line Items of the original Order the Item was damaged on. Use the Item Usage Quick Display to locate the conflicting Orders. Then head back to “Pending Items” to complete the action.
Missing & Damaged – Beyond Repair
RW will permanently remove the entered Quantity from your Inventory for both conditions through a negative Quantity Change Event.
In the pop-up, enter the date you want to create the Quantity Change Event. The default will be the day after the Restock Date of the Order it was damaged or missing on.
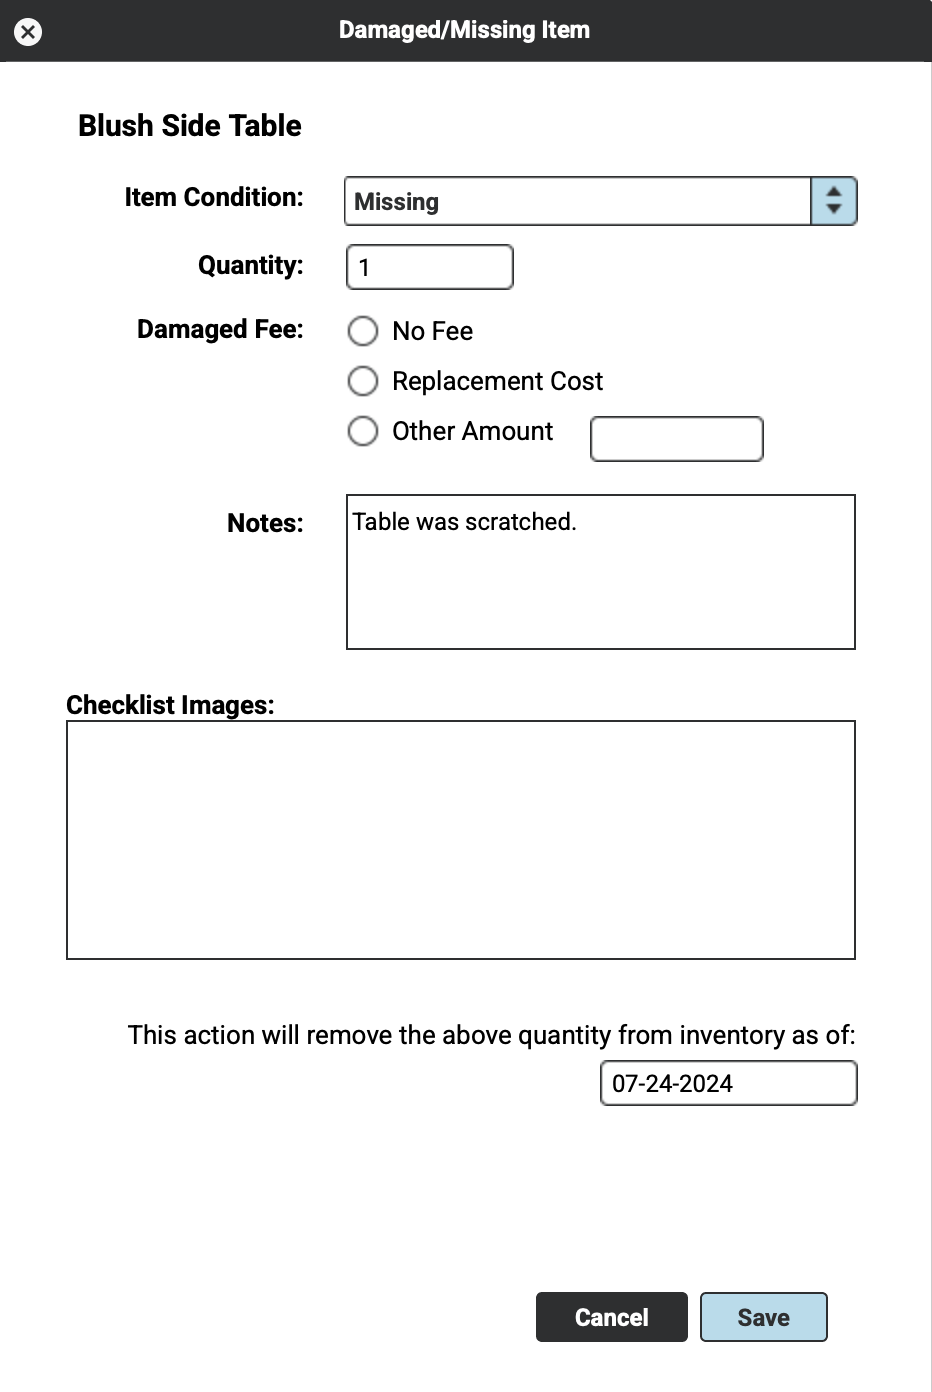
Once you click “Save,” the Quantity Change Event will be created and the Item will be removed from the Pending Items.
If there is a conflict with future Orders, you’ll receive an error message with the pertinent Invoice numbers. To resolve the conflict, you’ll need to remove the Item from these Orders and return to “Pending Items” to complete the action.
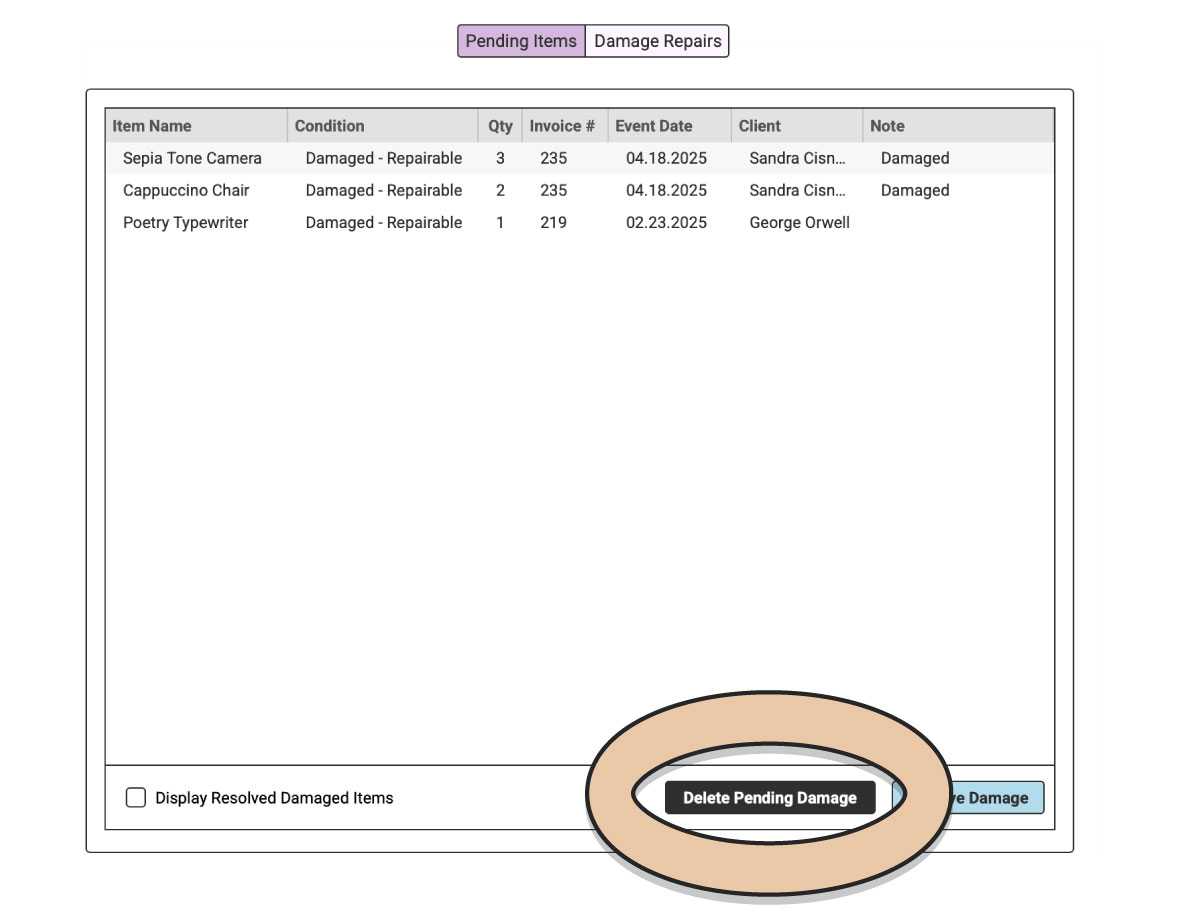
Delete Pending Items
If an Item was reported through the RW iOS App as Damaged or Missing but does not need to be managed, select the Item and click the “Delete Pending Damage” button in the bottom right corner.
Display Resolved Damaged Items
Within “Pending Items” tab, tick the box next to “Display Resolved Damaged Items” in the bottom left corner of the table to view past resolved Damaged and Missing Items.
This will display any previously reported and resolved Items in italics.
Untick the box to hide them.
Automatic Fees
If you select to pass along a fee to your customer, a new Line Item for the amount you entered will be added to the original Order.
A Line Item titled “DAMAGED/MISSING ITEM FEE” will be added to the Order.
From a Desktop Order — Line Items
Damaged and Missing Items can also be managed directly from a Desktop Order.
From the Orders screen, select the Order from which the Item was damaged or went missing.
Select the “Line Items” tab.
Click the green “Edit Order” button.
Select the pertinent Item.
Right-click on the Item.
Select “Damaged or Missing…”
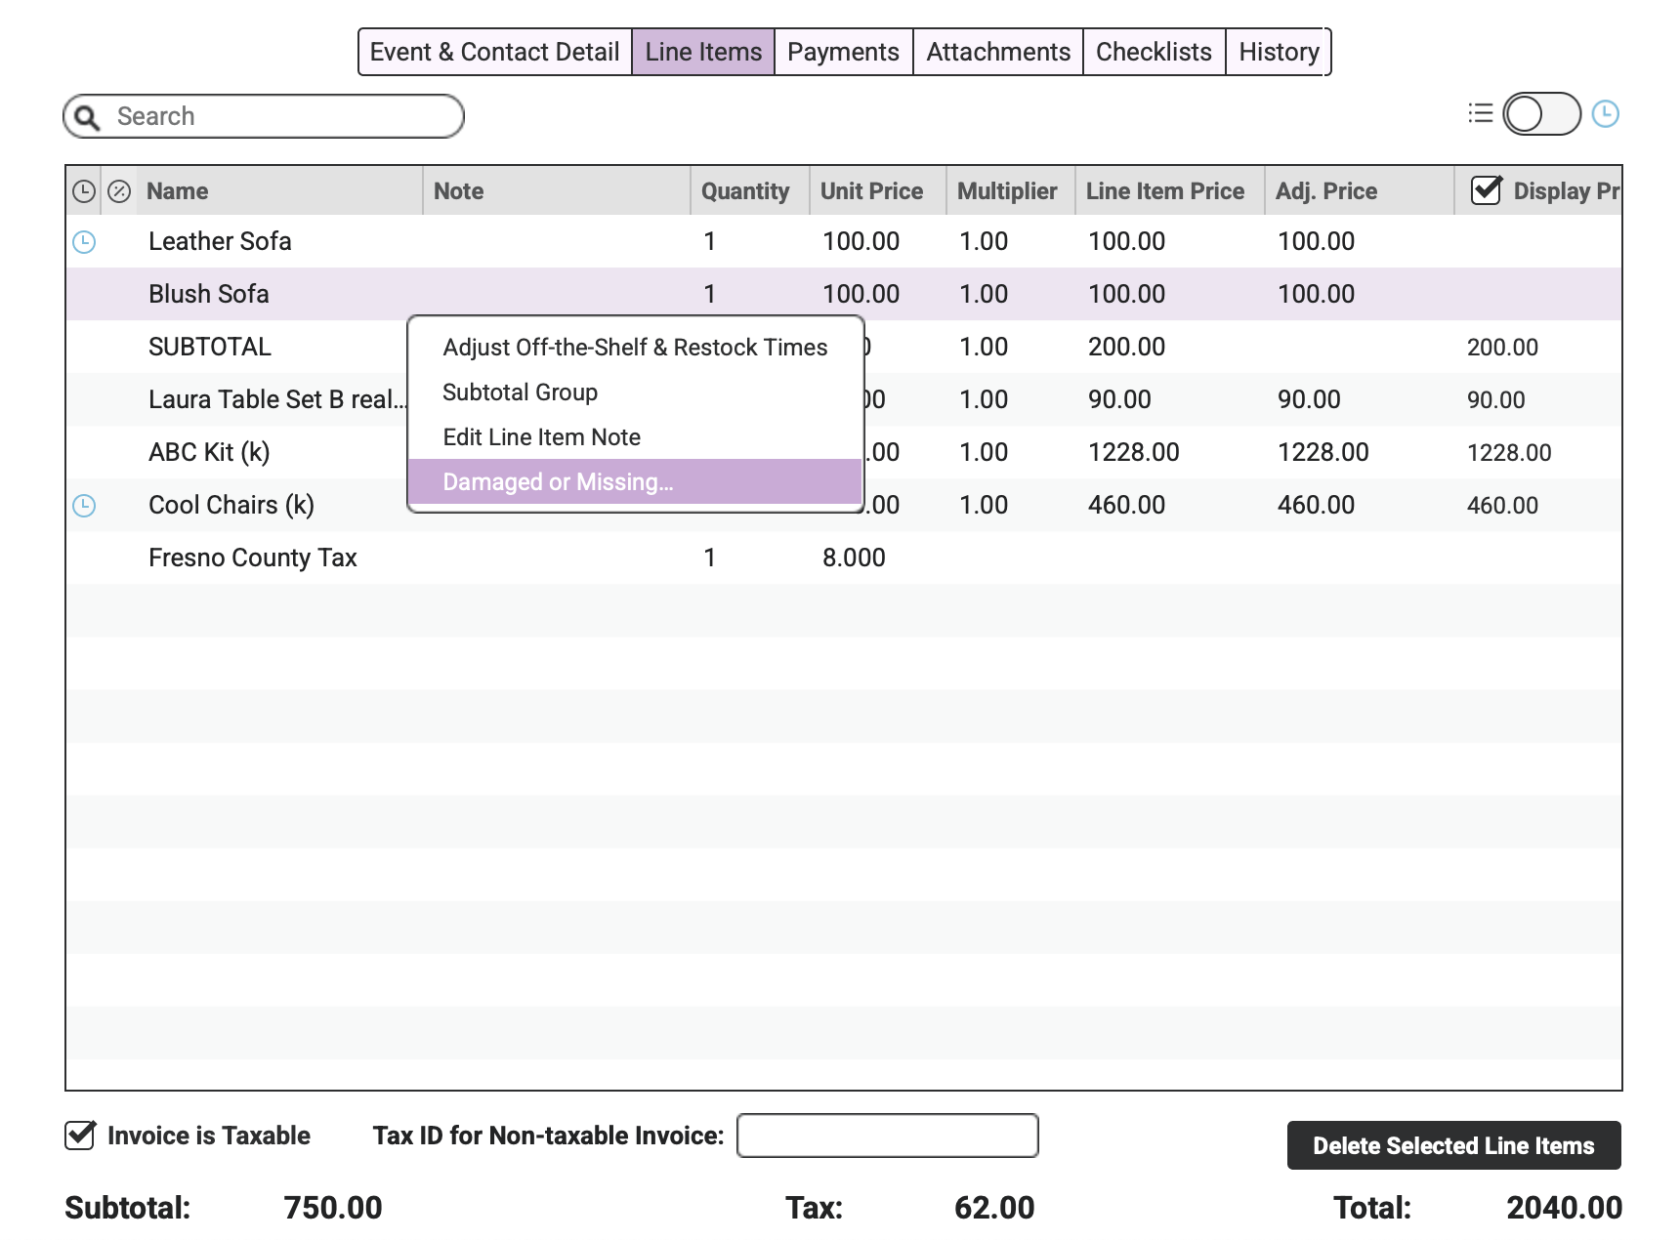
A pop-up that is similar to the Manage Pending Items pop-up described above will appear. Fill out the pop-up to complete the workflow in one step from the Order.
PLEASE NOTE:
Only Rental Items & Internal Items can be reported as Damaged or Missing. Conceptual Items and Kits cannot be marked as Damaged or Missing. Individual Kit Items can be reported through the iOS App and managed through Pending Items.
Damage Repairs
Within the Planning section of RW, head to “Damaged Items” and select the Damaged Repairs tab.
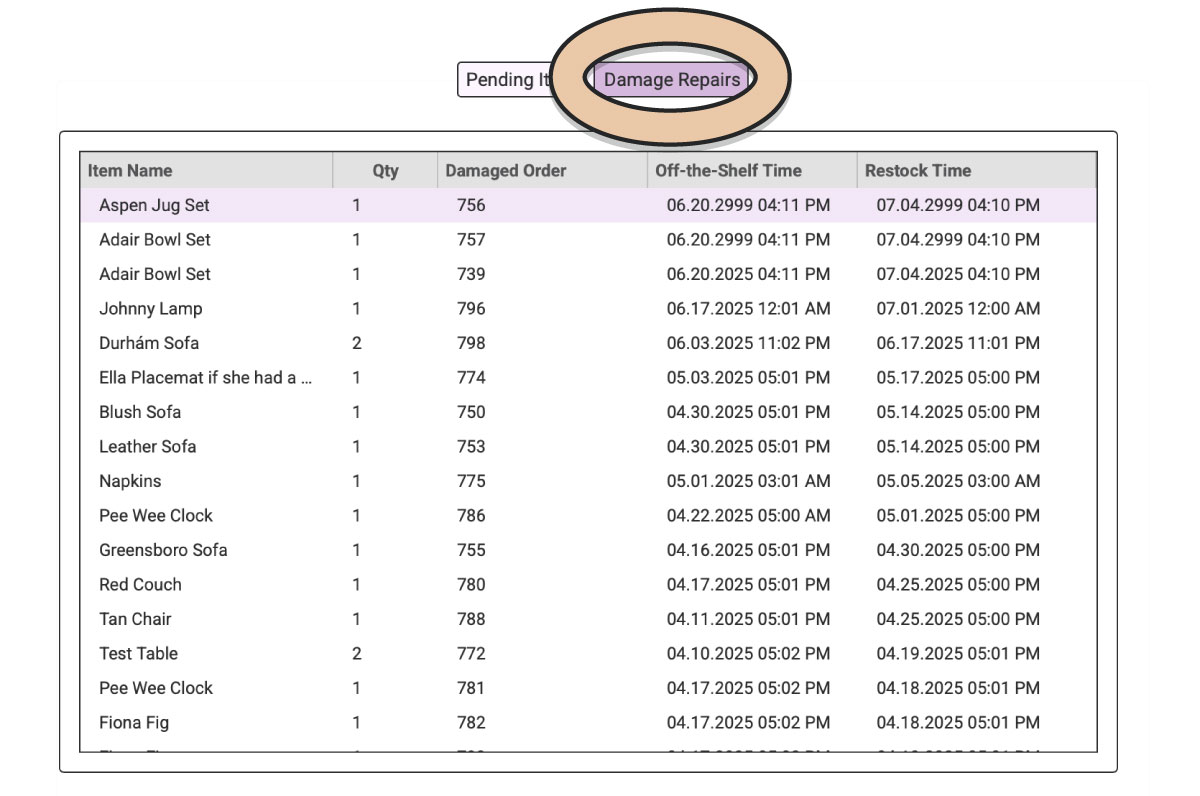
This table view gives you a list of all Items on Damaged Orders.
To manage any of these Items, head to Orders.
Damage Alerts Email
Choose who gets alerted anytime a Damaged Workflow is completed through the RW Elephant iOS App.
Head to the “Account” icon in the upper right corner of your browser window.
Select “Email Permissions” from the column on the left.
Select the “Damage Alerts” tab.
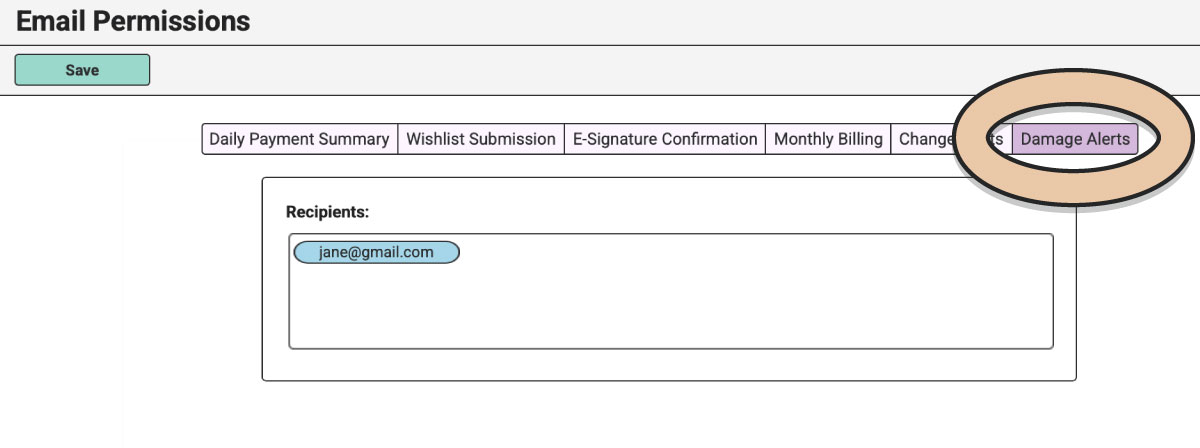
Enter the email address(es) of the team members you want to be notified.
This member of your team will receive an email like the one below to let them know there are pending damages that need to be managed.

Still deciding how you’ll handle damages in your rental biz? Check out our blog post about Dealing with Damages for some insight into the different options for managing damaged and missing Items.