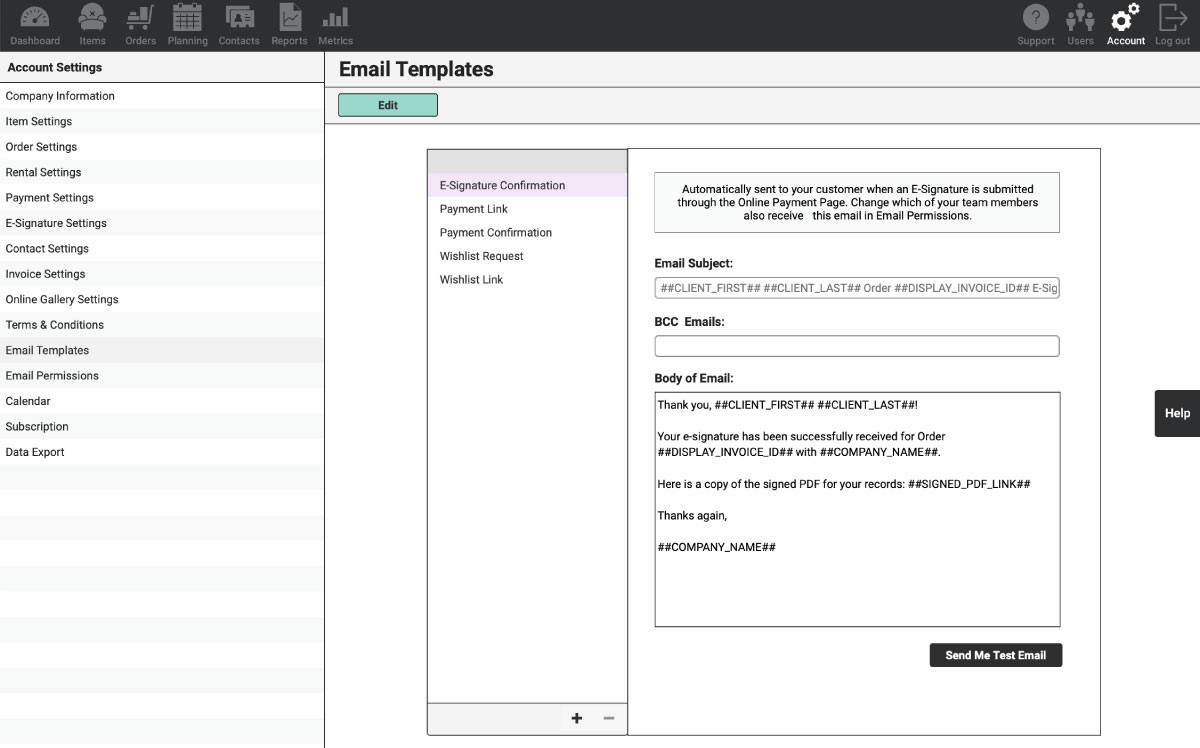
Email Templates within RW Elephant allow you to compose email messages to your customers that specifically reference their Orders.
You can find your Email Templates in the Account section. Navigate to the “Account” icon in the upper right corner of your browser window, then choose “Email Templates” in the left column.
There are several default Email Templates we’ve created for you, but you can also create and schedule your own.
Default Email Templates
The default email templates include:
- E-Signature Confirmation
- Payment Link
- Payment Confirmation
- Wishlist Request*
- Wishlist Link
- Unsuccessful ACH Payment**
The philosophy behind these templates is to give you the power to communicate however you’d like. For instance, if you have a very high-touch sales process, you may want your Wishlist Request email to be a friendly, “Hey we got your request, we’ll be in touch soon.” Then, behind the scenes, you’ll examine their request, organize it, make additional suggestions, and perhaps even have a phone call with the client before sending them the Wishlist Link email.
If, on the other hand, you want your customers to have access to as much information as possible on their own, you may include a link to their Wishlist PDF within the Wishlist Request email so they get their Wishlist right away with no personal intervention from you.
Every rental company that uses RW Elephant is different, but they all want to be as consistent, efficient, and helpful as possible for their customers. We want to partner with you to do just that.
Custom Email Templates
In addition to our default templates, you can schedule and send your own automated emails based on specific event triggers.
To create a new template, select the “+” button in the bottom right corner of the Email Templates list.

Click the green “Edit” button.
Fill in the Email Schedule:
First, enter the number of days, then select Before or After in the drop-down. Then, select the trigger—Event Date, Proposal Expiration, or Balance Due.
For example, you might want to send a reminder 3 days before a Proposal Expires or 2 days before a Final Payment is due.
Next, choose the Order parameters. Note that at least one option must be selected for each of these parameters.
- Order Status
- Wishlist
- Proposal
- Cancelled
- Confirmed
- Sale
- Damaged
- Order Type
- Delivery
- Will-Call
- Balance Status
- None
- Positive
- Negative
- Autopay Status
- Set to Autopay
- Not set to Autopay
Fill in the Email Subject. You can use Reference Tags to pull Order-specific data.
Type “##” to see a list of the supported Reference Tags to choose from.

Choose your Recipients—Client, Coordinator, Onsite Contact.
Add any BCC emails you’d like to receive this email, then fill out the Body of the Email. Just like in the Subject, you can type “##” to see a list of supported Reference Tags to choose from.
Here is a Guide for the supported Reference Tags:
Company Info
Your Company Name: ##COMPANY_NAME##
Your Company Phone: ##COMPANY_PHONE##
Contacts
Client First Name: ##CLIENT_FIRST##
Client Last Name: ##CLIENT_LAST##
Client Name (First and Last): ##CLIENT##
Coordinator Company: ##COORDINATOR_COMPANY_NAME##
Email Address: ##EMAIL_ADDRESS##
Invoice Details
Invoice Number: ##DISPLAY_INVOICE_ID##
Event Date: ##EVENT_DATE##
Delivery Window: ##DELIVERY_WINDOW##
Return Window: ##RETURN_WINDOW##
Invoice Total: ##INVOICE_TOTAL##
Payments
Deposit Due: ##DEPOSIT_DUE##
Payment Due Date†: ##PAYMENT_DUE_DATE##
Remaining Balance: ##BALANCE##
Balance Due Date: ##BALANCE_DUE_DATE##
Link to Online Payment Page‡: ##PAYMENT_LINK##
Link to Gratuity Payment Page§: ##GRATUITY_LINK##
Link to Invoice PDF: ##PDF_LINK##
Link to Signed Invoice PDF: ##SIGNED_PDF_LINK##
Unsuccessful ACH Payment Error**: ##ERROR_DESCRIPTION##
Processed Payment Details
Amount paid: ##THIS_PAYMENT_AMOUNT##
Date payment was processed: ##THIS_PAYMENT_DATE##
Method used to process payment: ##THIS_PAYMENT_METHOD##
To see what the email will look like to your customers, click the black “Send Me Test Email” button. This will send a test to your User email address.
When you’re satisfied with your template, turn on the “Activate” toggle in the upper right corner. It will be blue to indicate it is active.
Select the green “Save” button.
RW will send the automated email on your behalf at the scheduled time for each Order that meets the criteria.
Create as many custom emails as you’d like and RW will be sure each customer is notified.
All of the emails that RW sends on your behalf will be logged within the History tab of each given Order.
Email Attachments
Upload attachments to include in your Custom Email Templates.
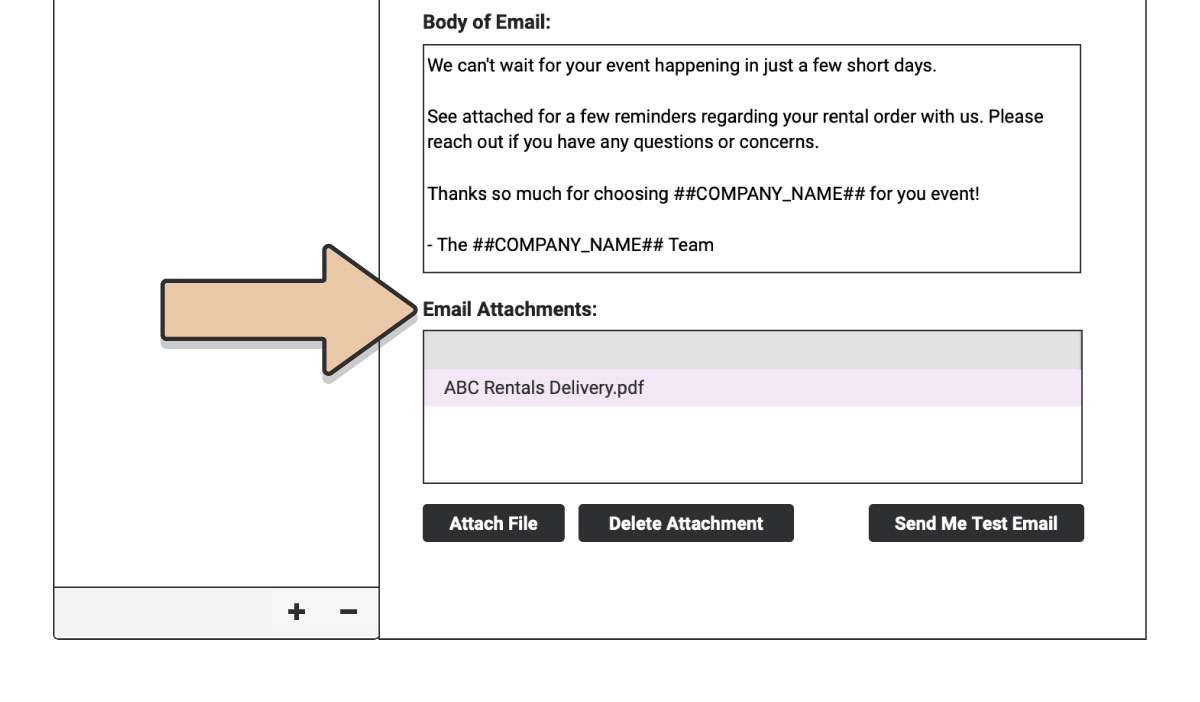
To upload an attachment, select the “Attach File” button in the bottom left corner of the template.
From care instructions, to delivery expectations, to other important company documents, you can upload an attachment to your custom email and RW will send it out on your behalf. We recommend PDF, JPG, or PNG file types.
As always, don’t forget to send yourself a test before activating your Custom Template!
—
*Only available to users who have enabled Online Wishlist Creation via the Default Online Gallery, the WordPress Plugin or the Online Gallery Snippet for Squarespace or Shopify.
**Only available to users who have enabled ACH processing through RW Pay.
†Payment Due Date will populate based on the Order Status. Proposals will generate the Proposal Expiration Date (Deposit Due Date). Confirmed Orders will populate the Final Balance Due Date.
‡This Reference Tag is only relevant to users who have enabled Integrated Credit Card Processing within R.W. Elephant.
§This Reference Tag is only relevant to users who have enabled RW Pay.