Before you go any further, make sure you know a bit about what our WordPress Plugin can do for you and your website.
Here’s some info about how to install and configure the Plugin on your WordPress-based website.
IMPORTANT INFORMATION
BACKUPS: We always recommend creating a restorable backup of your website, theme and all other website resources before installing the RWE WP Plugin. To find out more about creating backups for your WordPress website you can refer to the WordPress documentation at https://codex.wordpress.org/WordPress_Backups
COMPATIBILITY: The RW WordPress Plugin is compatible with websites created with WordPress software (WordPress.org). Please keep in mind, if your website is managed/hosted using WordPress.com the Wishlist functionality is not supported due to limited configuration options.
PRE-INSTALLATION
Since this is an improved v2+ of our original plugin and includes major changes, it is unfortunately incompatible with previous versions. With that being said, it is very important that you uninstall and delete previous versions before installing v2+.
The plugin has been optimized for use with WordPress themes that include page-templates for displaying “Full-width” pages (pages that use the full width of the screen and generally don’t have a sidebar).
The plugin will need to generate two pages within WordPress to function:
- A page to display the “Inventory Gallery.”
- A page to display the “Wishlist.”
You can create both pages manually within the WordPress “Pages” menu before installing the plugin and call them anything of your choice, or allow the plugin to generate them automatically for you during the installation process (automatically generated pages will be named “Gallery” and “Wishlist”).
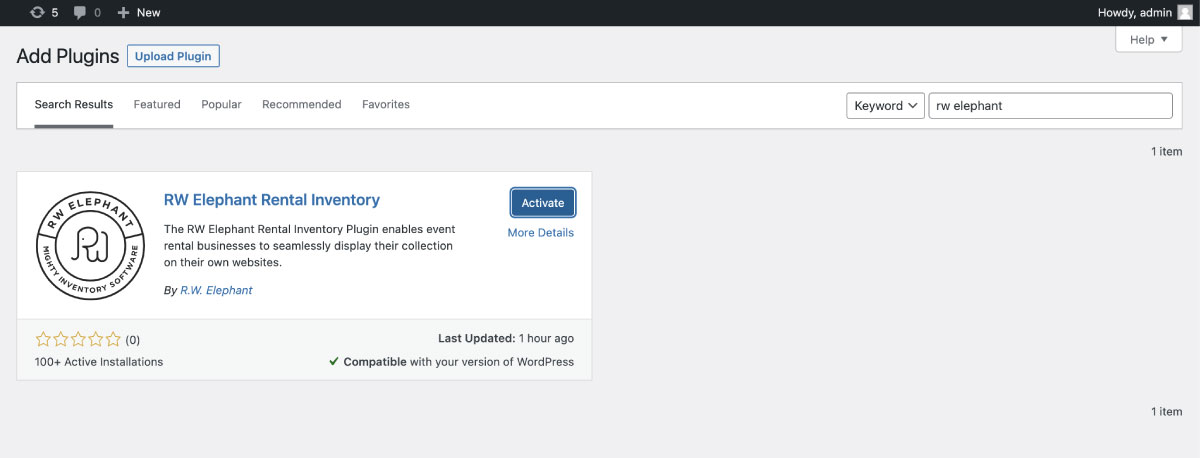
INSTALLING THE PLUGIN
Note: You need an RW Elephant ID and API key to use this plugin.
You can find the RW Rental Inventory Plugin in the WordPress Plugin Directory here. Click on “Download” to start the installation process.
Follow the WordPress guidance for manually installing a plugin.
When the plugin has finished installing, you can click on the “Activate” button to begin the setup process.
SET UP WALKTHROUGH
We have included a step-by-step Walkthrough within the plugin to guide you through the initial setup process, this covers all the basic settings and options to get you up and running.
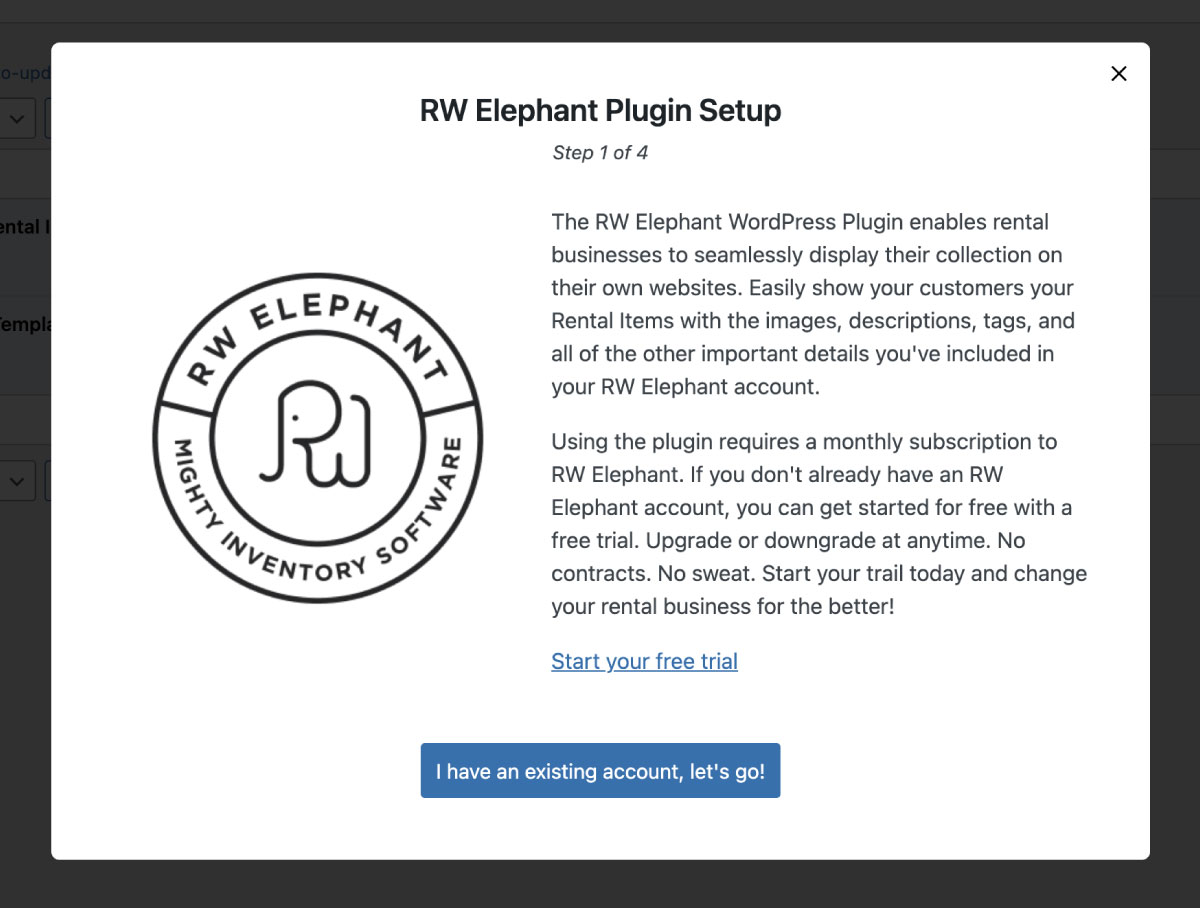
Step 1 – RW Account
Using the plugin requires a monthly subscription to RW Elephant. If you don’t already have an RW Elephant account, you can get started with a free trial. If you have your credentials ready, go ahead and click “I have an existing RW Elephant Account” to continue.
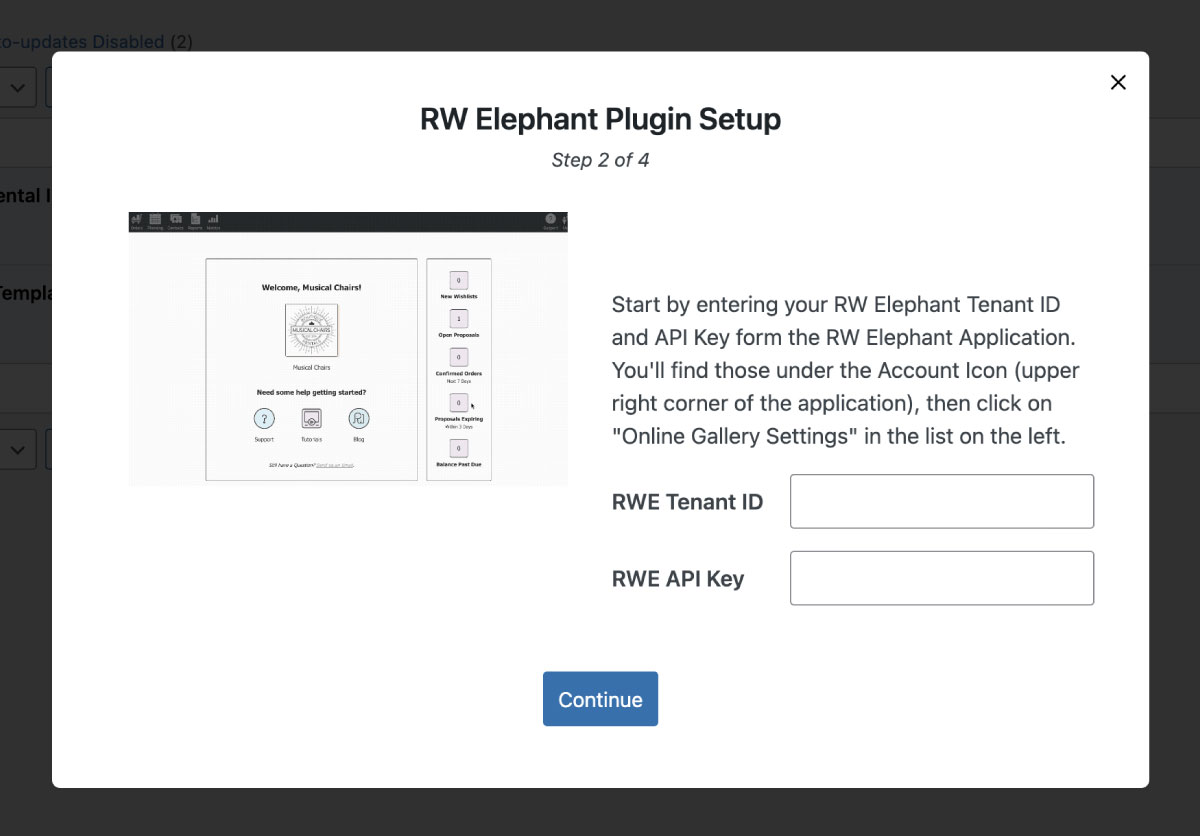
Step 2 – Credentials
Enter your RW Tenant ID and API key in the fields provided to connect your WordPress site to RW. Click “Continue”.
Note: You’ll find those details listed under the Account Icon (upper right corner) of the application, then click on “Online Gallery Settings” in the list on the left.
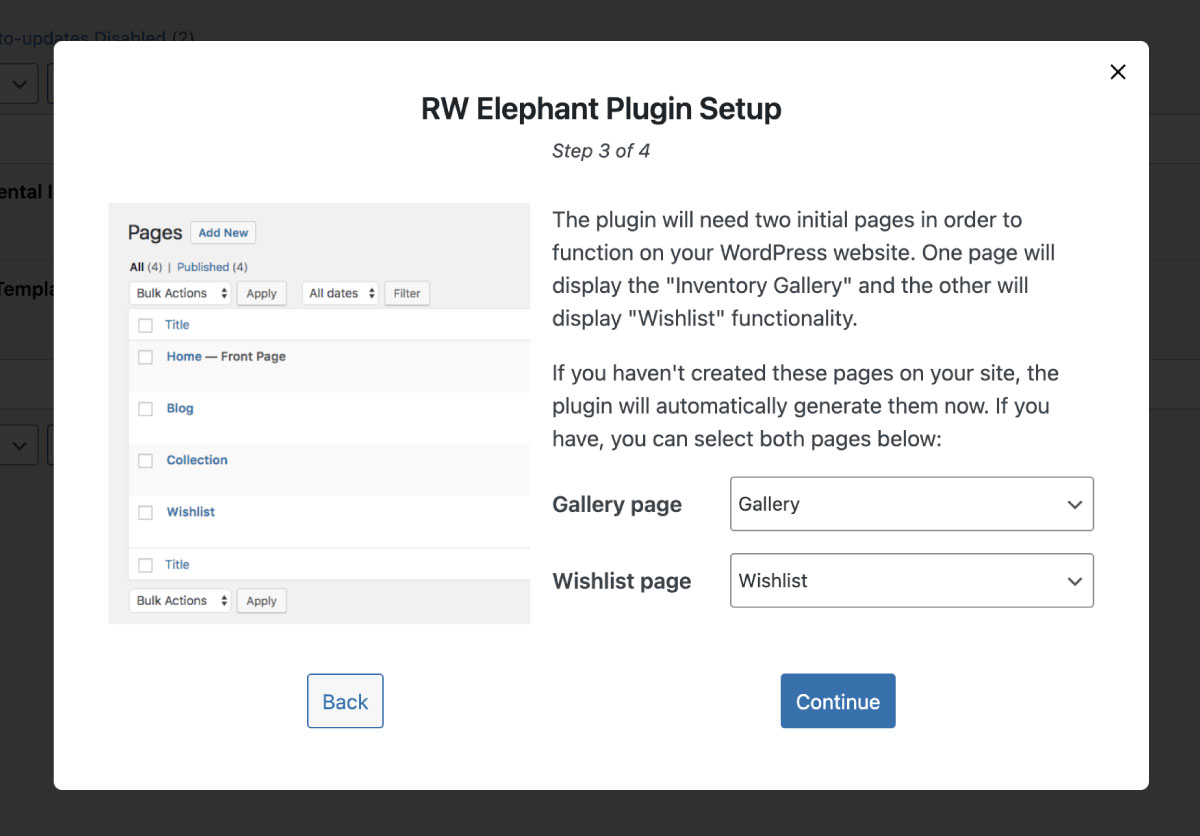
Step 3 – Page Selection
If you have already created the pages that you wish to display your Gallery and Wishlist on your site, you can select both here. You can alternatively allow the Plugin to create both pages for you automatically. Click “Continue”.
Note: The Plugin will call the pages “Gallery” and “Wishlist” by default. In the installation below you can see that we’ve selected the “Collection” and “Wishlist” pages
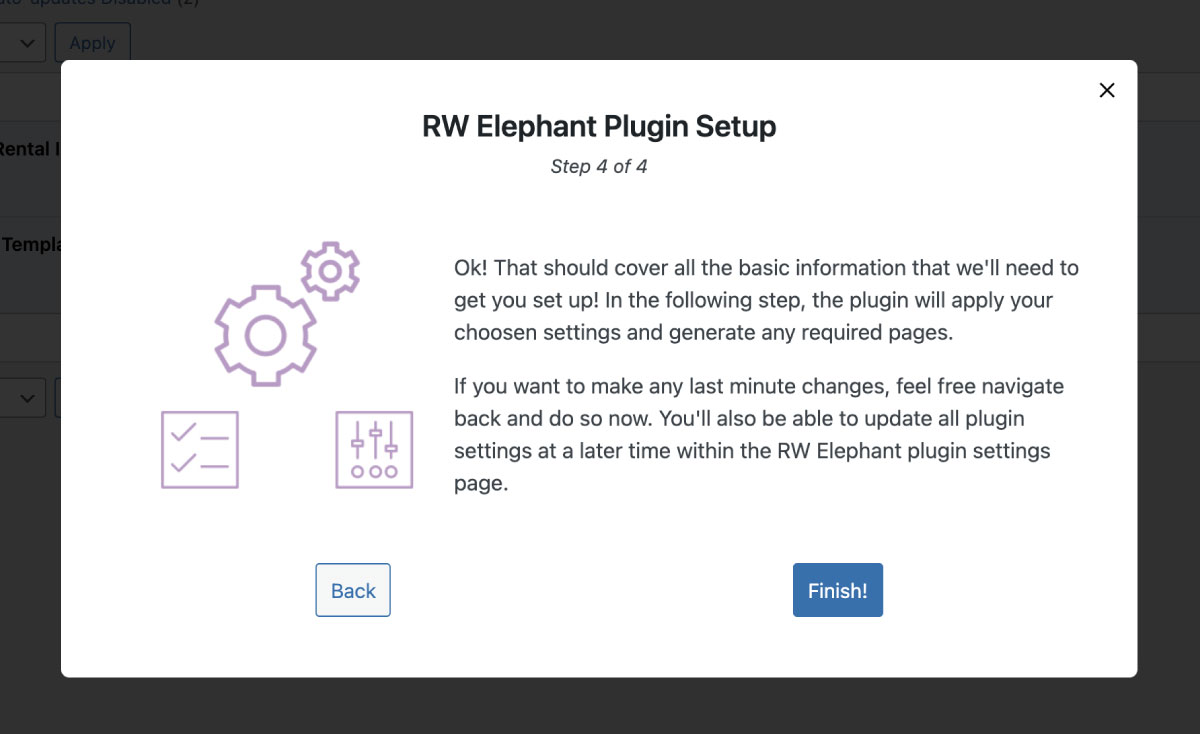
Step 4 – Setup Complete
That’s it we’re finished with setup! If you’re happy with all of the details entered, you can go ahead and click “Finish”. If you want to amend anything previously entered you can do that by clicking on the “Back” button.
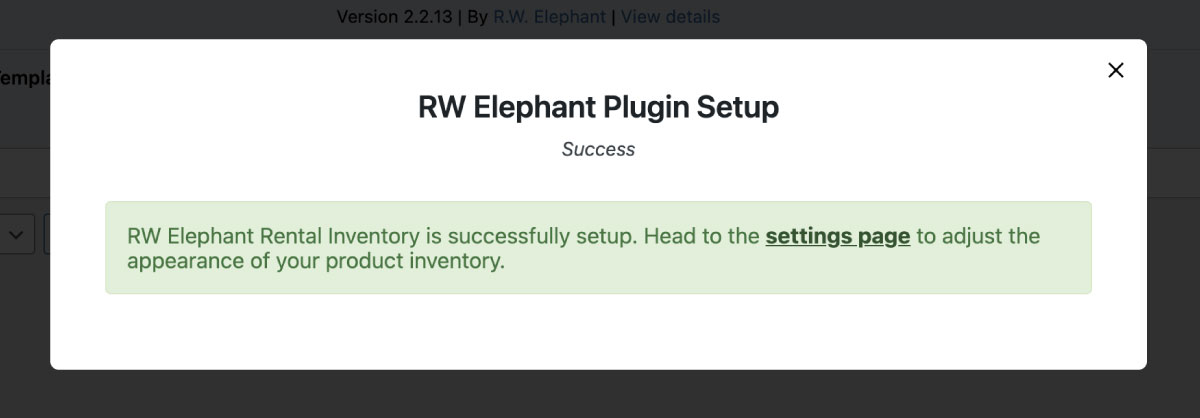
Install Complete
At the end of the setup process, the Plugin will display a notification to confirm that the installation was successful and provide a direct link to the RW Settings.
Wishlist Page Caching:
Some WordPress hosting providers, and speed/cache focused plugins, will automatically cache all site pages to improve overall site speed. The Wishlist is a dynamic page that cannot be cached. If you experience Gallery items not being added to the Wishlist, you will need to deactivate Page Caching for the assigned Wishlist page only.
For hosting providers, the option to deactivate page caching for the Wishlist page should be available within the hosting providers Admin Panel. If not, you may need to reach out to the hosting provider Support team.
For plugins, the option to deactivate page caching for the Wishlist page should be available within the specific plugin Settings Page. If not, you may need to reach out to the plugin Support team.
TESTING THE PAGES
You should now be able to view the plugin “Gallery” and “Wishlist” on the pages selected during the Setup process.
Note: *e.g. https://yourdomain.com/gallery, https://yourdomain.com/wishlist*
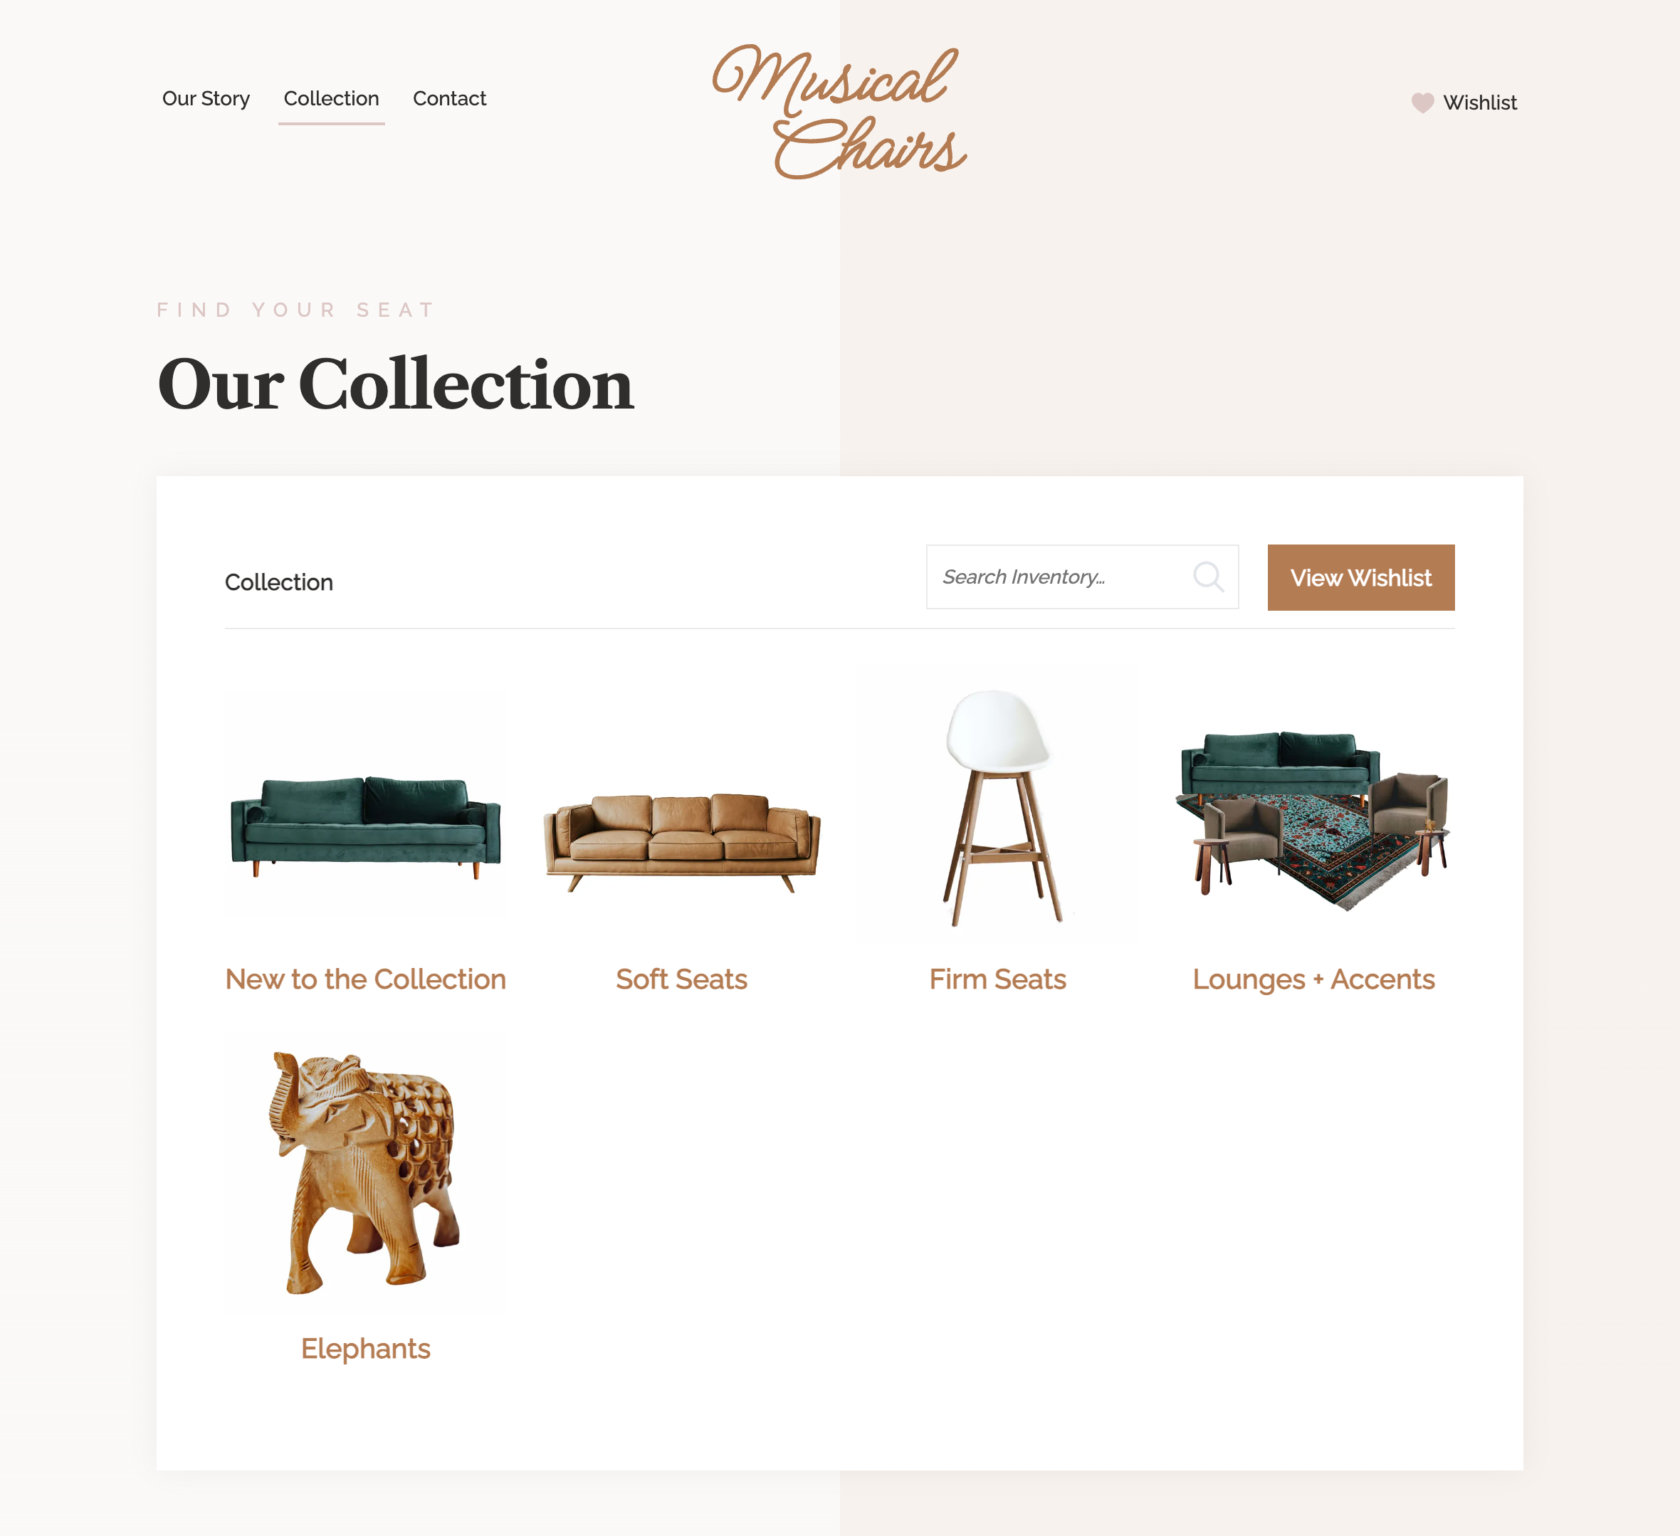
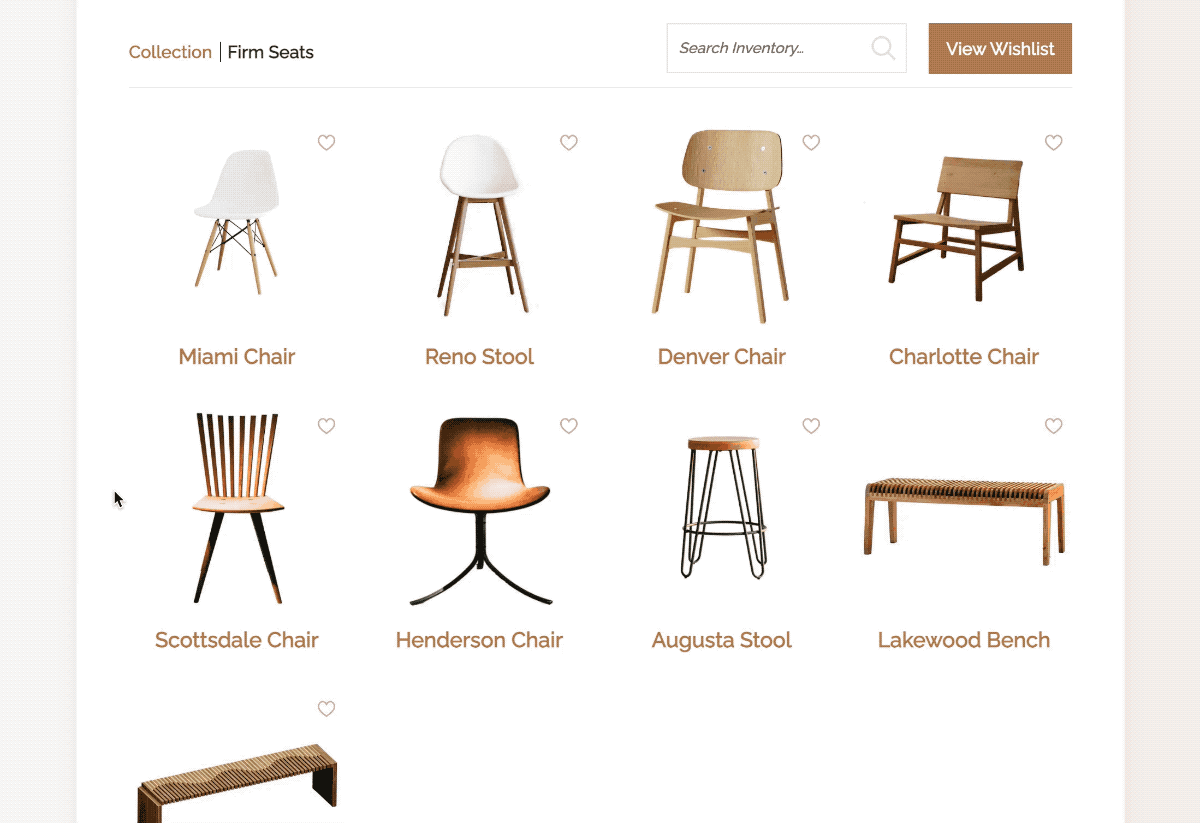
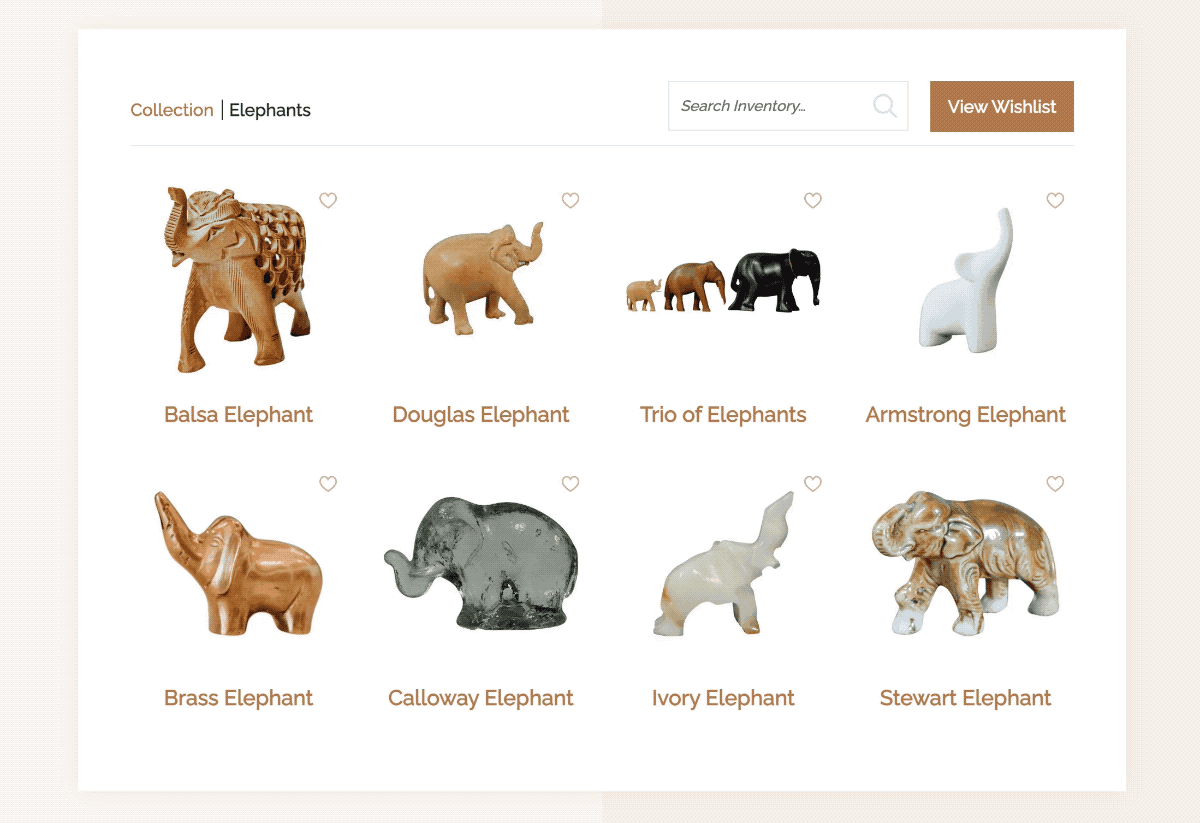
Here’s our Gallery (assigned to the “Collection” Page):
and our Wishlist (assigned to the “Wishlist” Page):

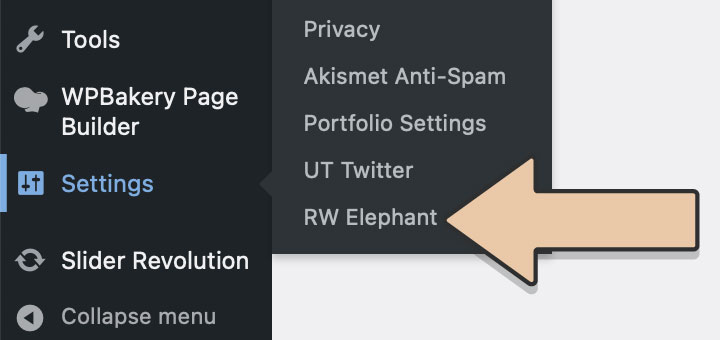
PLUGIN SETTINGS
Through the “RW Settings” option located in the “WordPress Settings” menu, you will be able to configure some additional options for your RW Gallery and Wishlist.
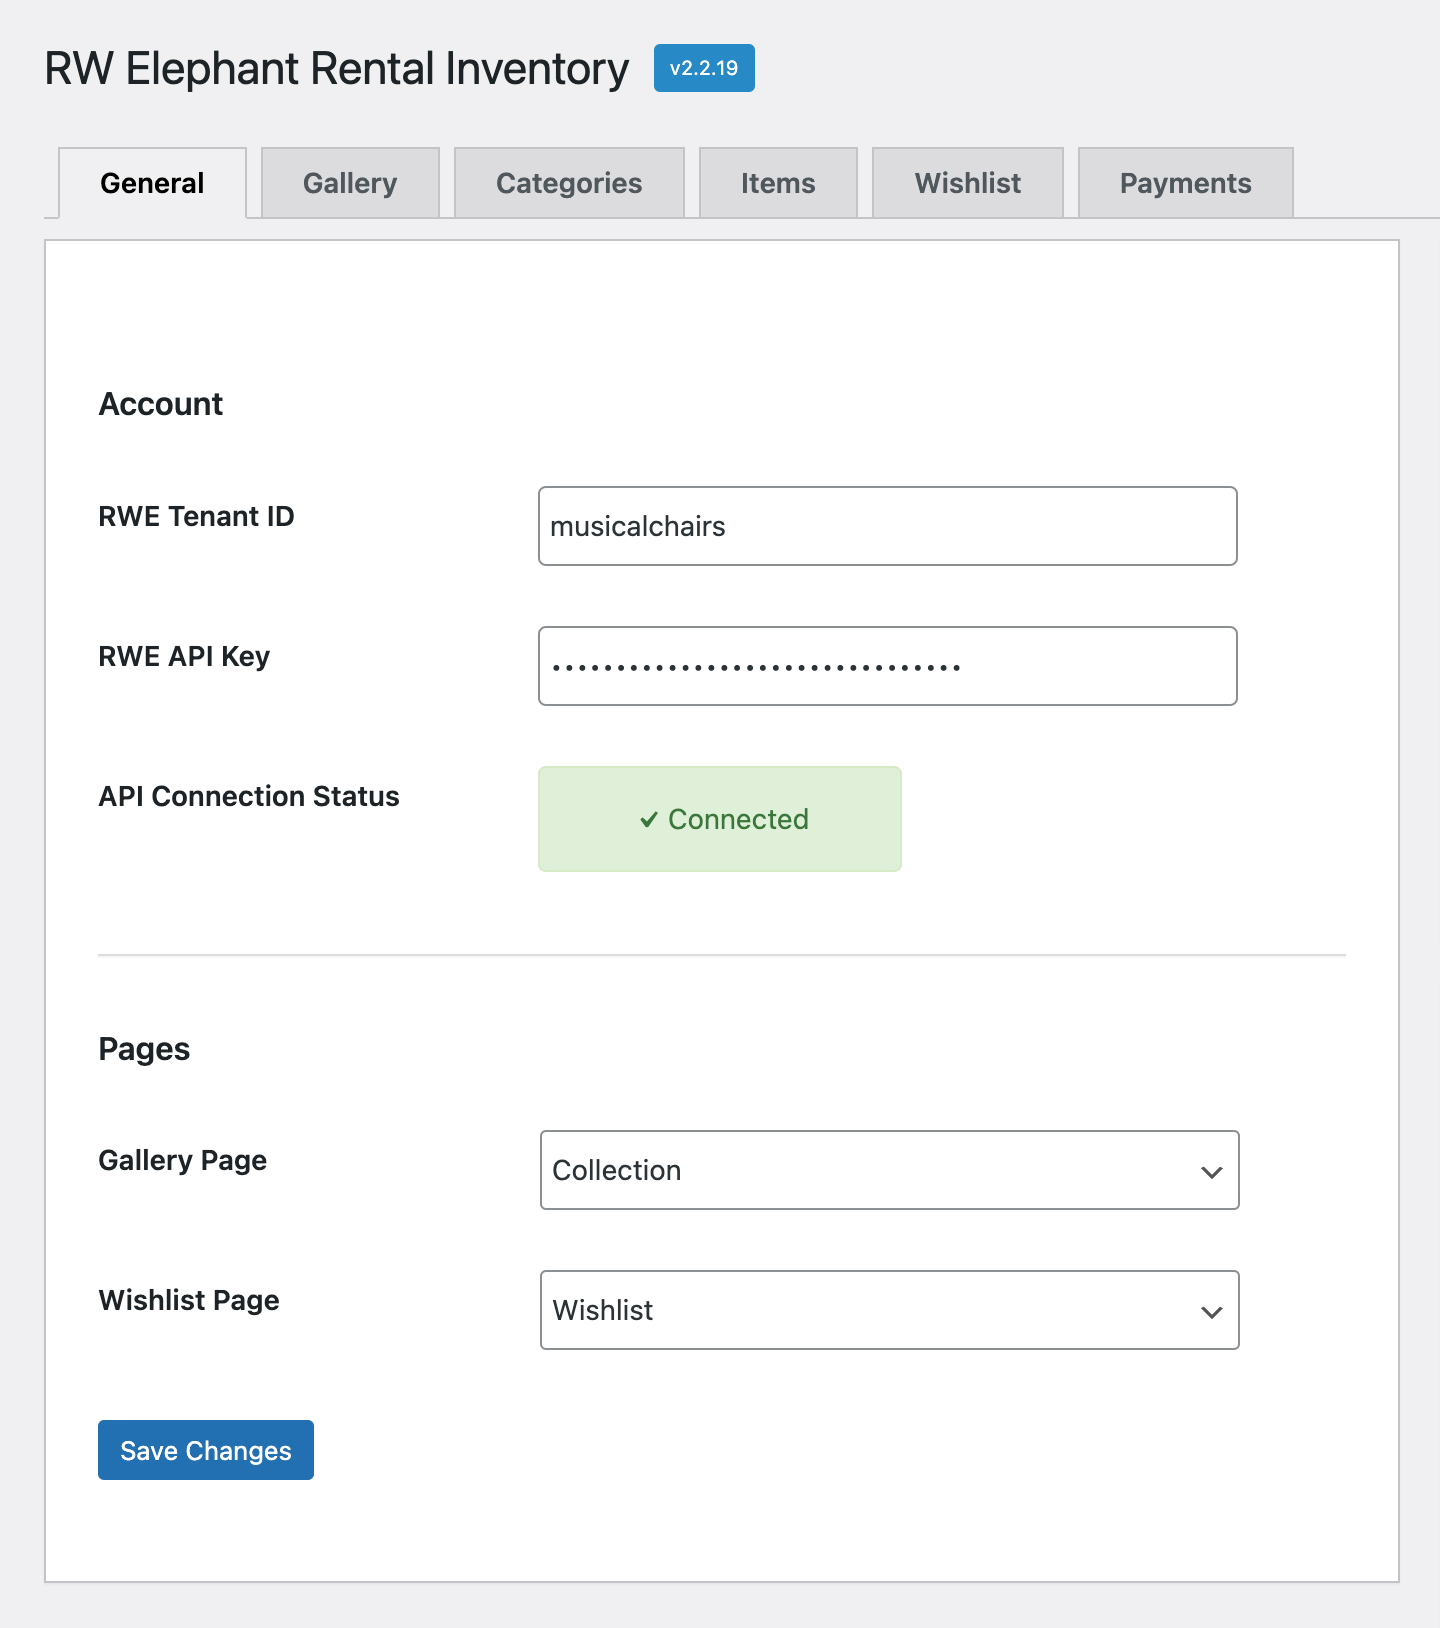
General Tab
The “General Tab” allows you to make updates or changes to your RW account details (RW Tenant ID and API key) and the pages that have been setup to display your Gallery and Wishlists. There is also a useful connection message that can help diagnose a problem if details are entered incorrectly.
Gallery Tab
The “Gallery Tab” allows some basic customizations that can be applied to Gallery functionality across the plugin.
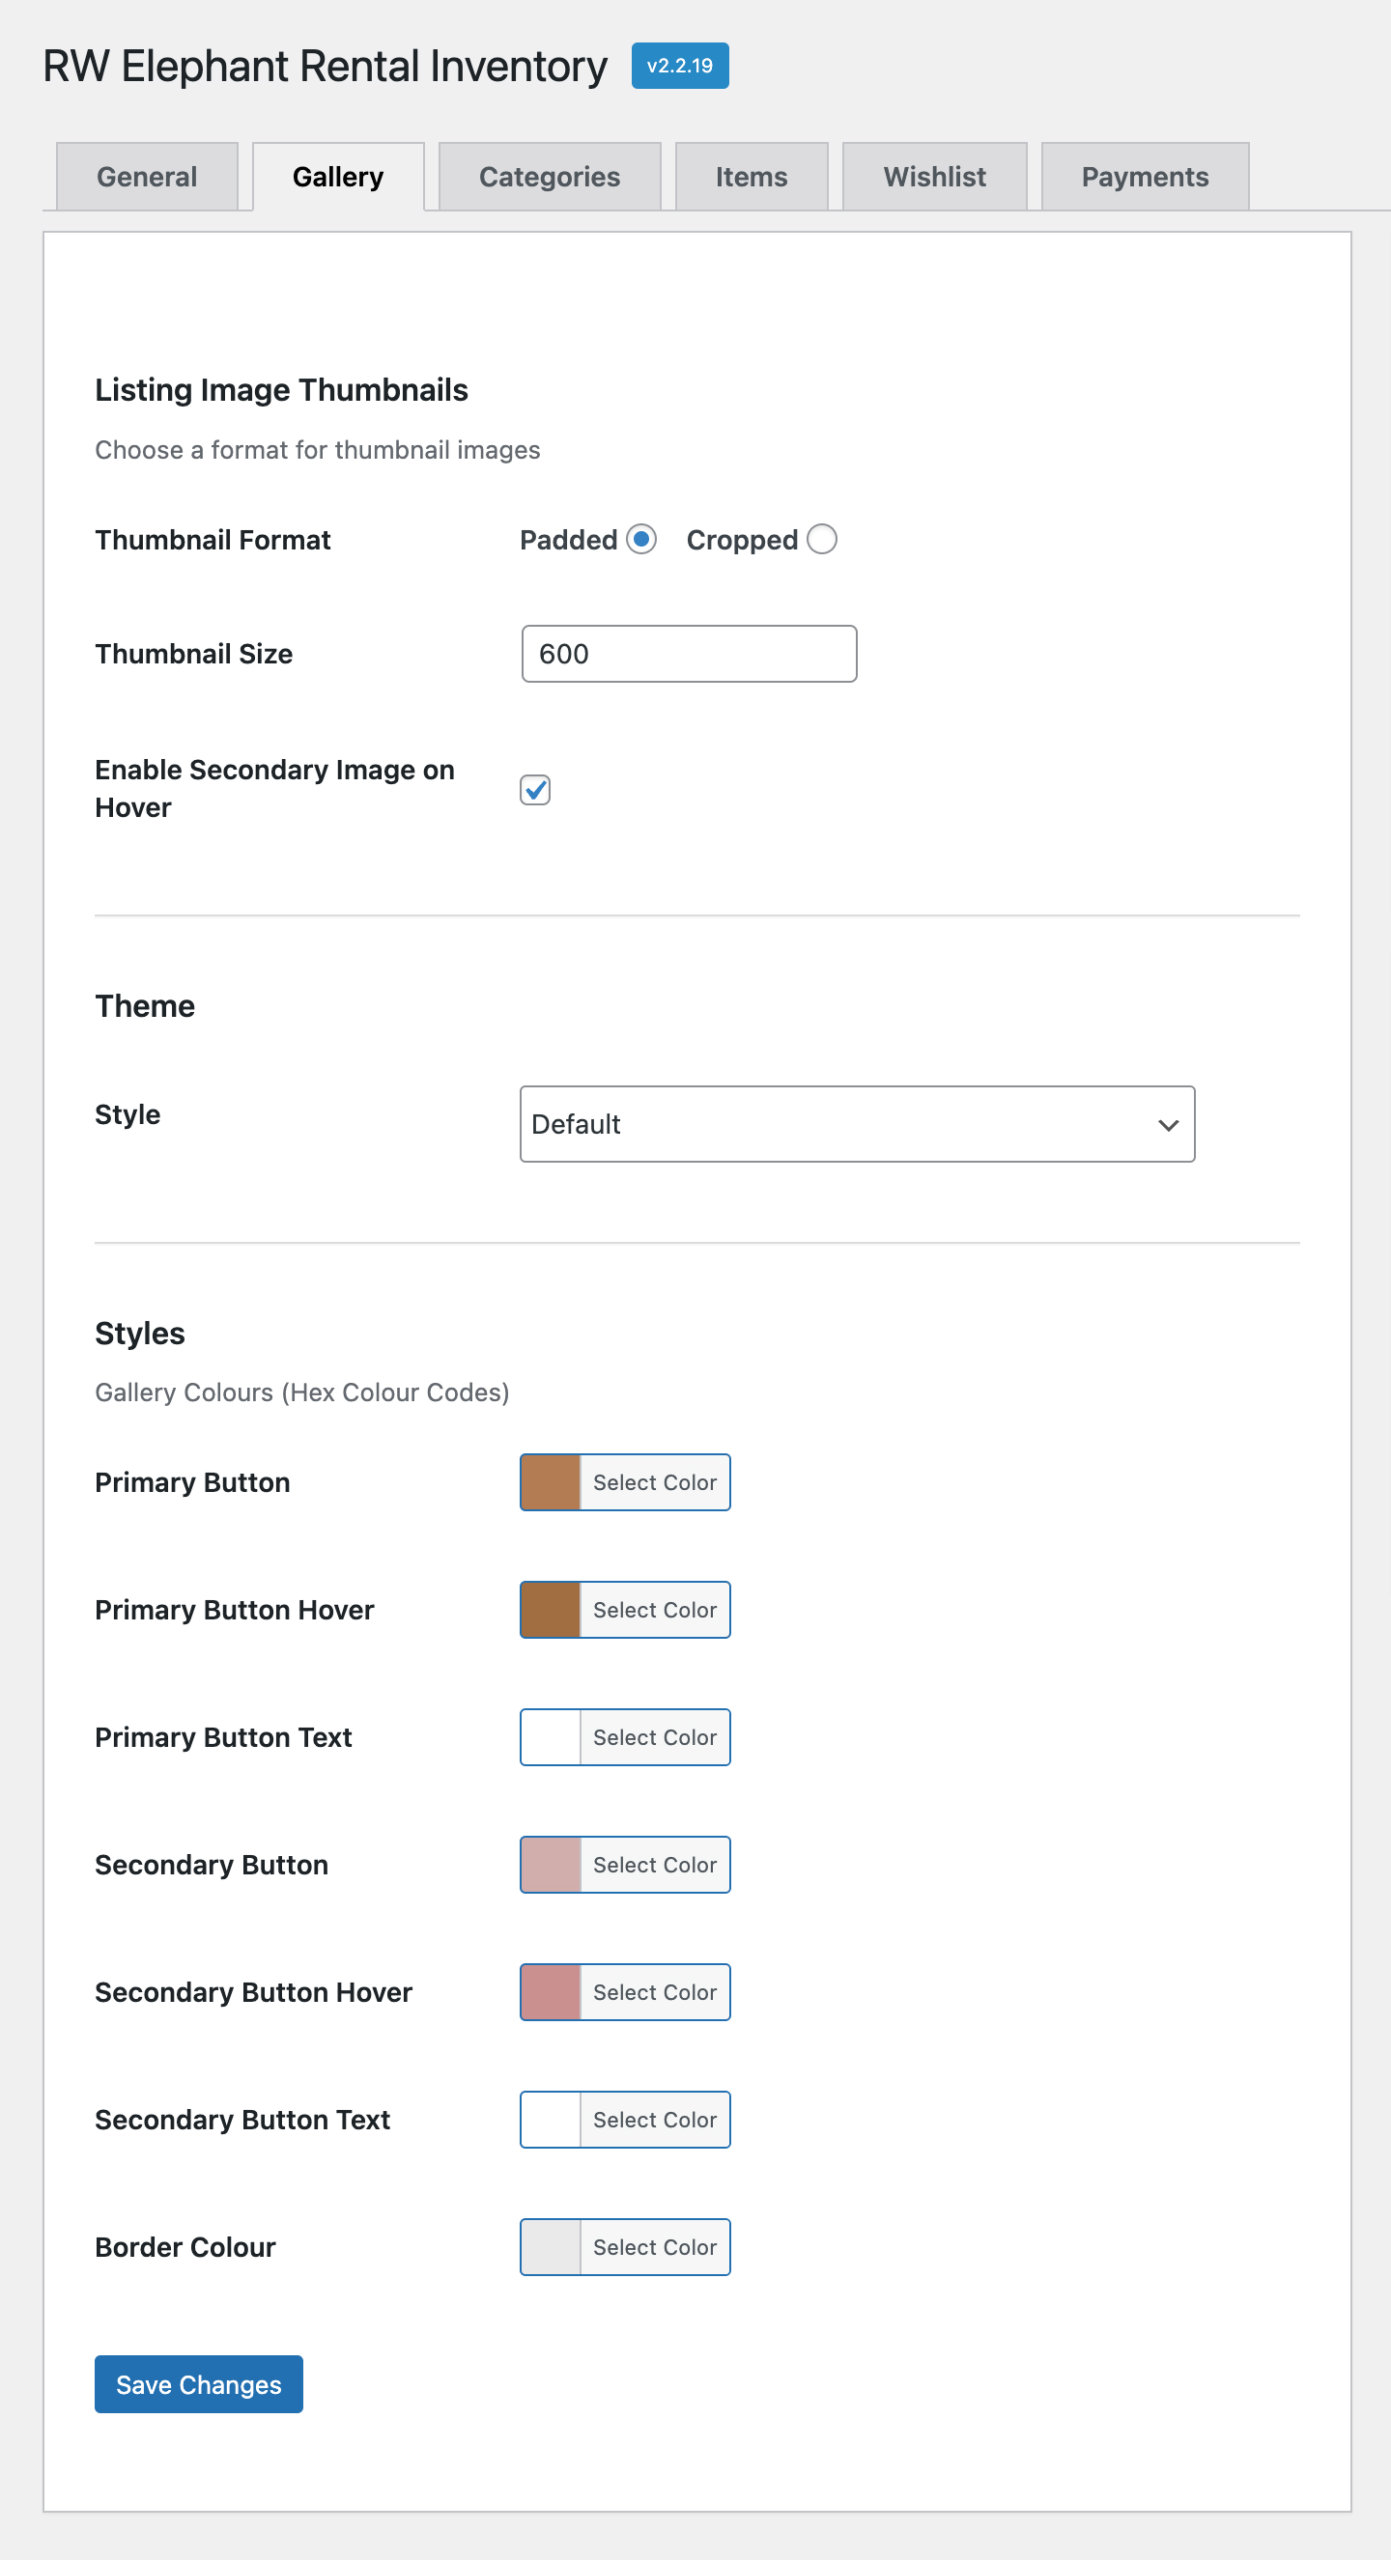
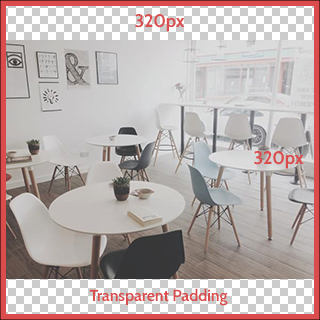
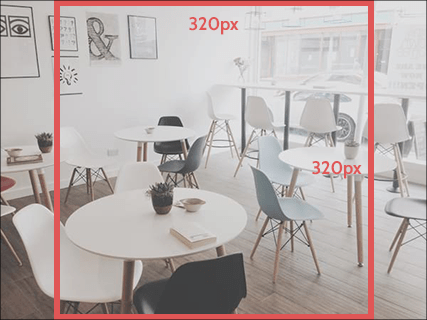
Listing Image Thumbnails – When you upload an image to the RW Elephant application we generate a 320px square cropped image (as the default size) that is used for Item listing views within the plugin. You can choose between the “Padded” or “Cropped” formats here.
Padded Thumbnail format example:
Cropped Thumbnail format example:
Listing Image Thumbnail Size – Listing thumbnail images are 320px by default based on the standard 4 column layout. If you’re customizing the gallery layout and require larger images, you can set the size here. Larger images take longer to load, so we recommend using the smallest image size that fits into your design or custom layout.
Enable Secondary Image on Hover – Activating this setting will display an items second image (if available) on hovering the item in a list view.
Theme – This setting will allow you to select a theme that applies some light styling to your Gallery Items and Categories. (Default – No specific styling, Overlay – Adds a simple dark overlay on hover, Polaroid – Adds a Polaroid style to Items and Categories.)
Styles – Add custom Button colors to fit with your brand.
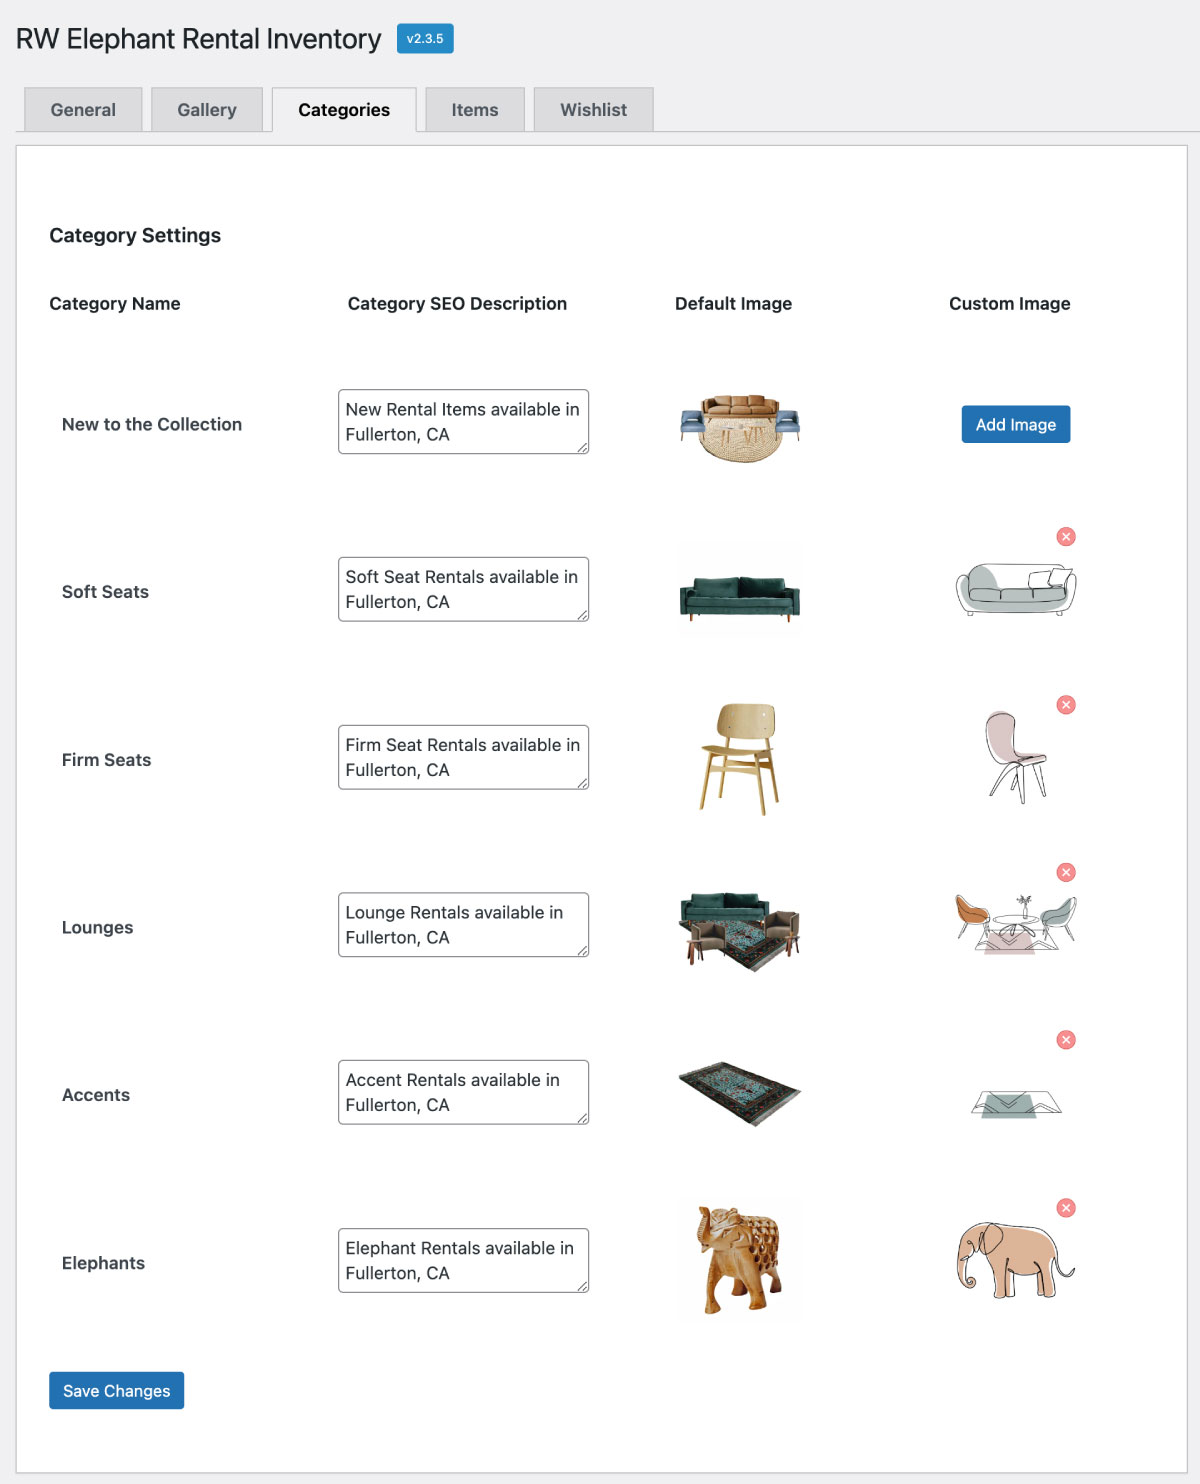
Categories Tab
By default, the RW Elephant Inventory Plugin pulls the Category thumbnail image from the first Item within each Category. The “Categories” Tab allows you to upload a custom image instead. Click on the “Add Image” button to upload a new image for each category listed.
Note:
When you add an image that you want to use as a Category Replacement, the 320px image thumbnail crop is created by WordPress. If you want to use an image that existed in WordPress Mediau before you installed the RW Elephant Inventory Plugin, you will need to regenerate the image thumbnail by using a plugin like https://wordpress.org/plugins/regenerate-thumbnails/Regenerate Thumbnails
Category settings also include a “Category SEO Description” field to add text descriptions to category pages. This enhances Search Engine Optimization for category pages by adding an “og:description” meta tag containing the Category Description text. For instance, include keywords your target market is searching for in these SEO Descriptions (e.g. the locations you service, style keywords, etc.).
Items Tab
The “Items Tab” allows you to add customizations to Item pages and enable/disable specific functionality related to all Items across the Plugin.
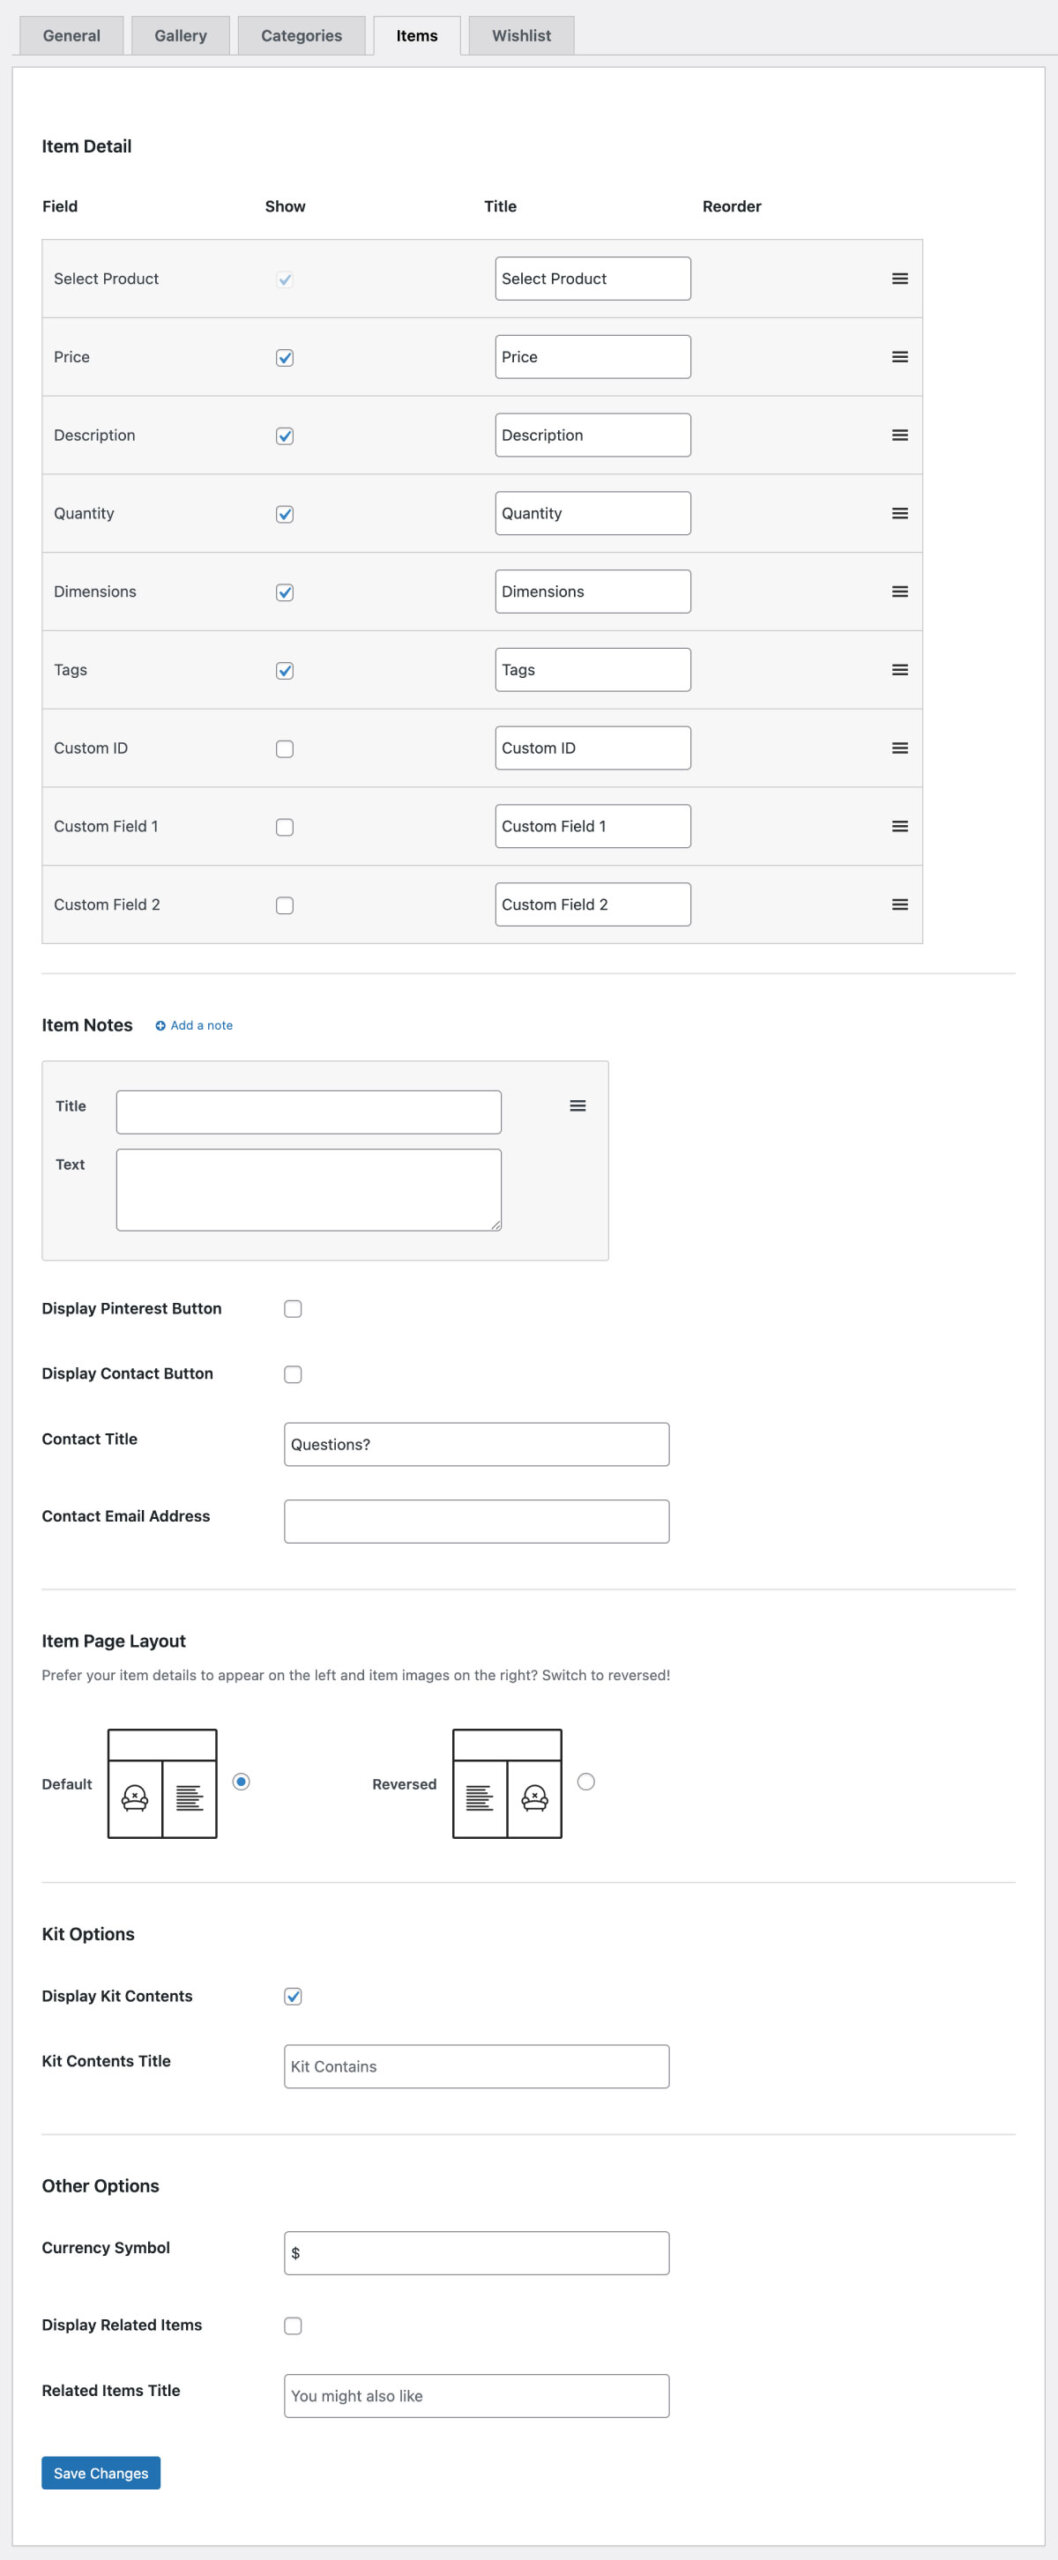
Item Details – This section allows you to choose which Item fields are displayed on Item Pages, simply check or uncheck the fields you’d like to display. You can also rename each field label and rearrange the order using the icon to the right of each field.
The “Select Product” field is related to the Item Variations feature. For items that have variations available, no label will be displayed before the drop-down by default. If you would like to display a label, you can change it here.
Item Notes – Add one or more notes in this section that will appear on every Item Page.
Pinterest & Contact – Include a simple Pinterest “Pin Item” button and “Contact” button on all Item Pages. You’ll need to provide an email address for the Contact button, which will auto open a new email with your email address pre-filled.
Item Page Layout – Choose a layout for the Item Pages (Default – Images on the left, Details on the right, Reversed – Details on the left, Images on the right).
Kit Options – When displaying a Kit, this option allows you to display the Items contained within the Kit.
Currency Symbol – The default currency prefix for an Item Price is “$”, if you use another currency set the prefix using this option.
Related Items – This option allows you to display Related Items on the Item page.
Wishlist Tab
The “Wishlist Tab” allows you to make customizations to WordPress based Wishlist functionality.
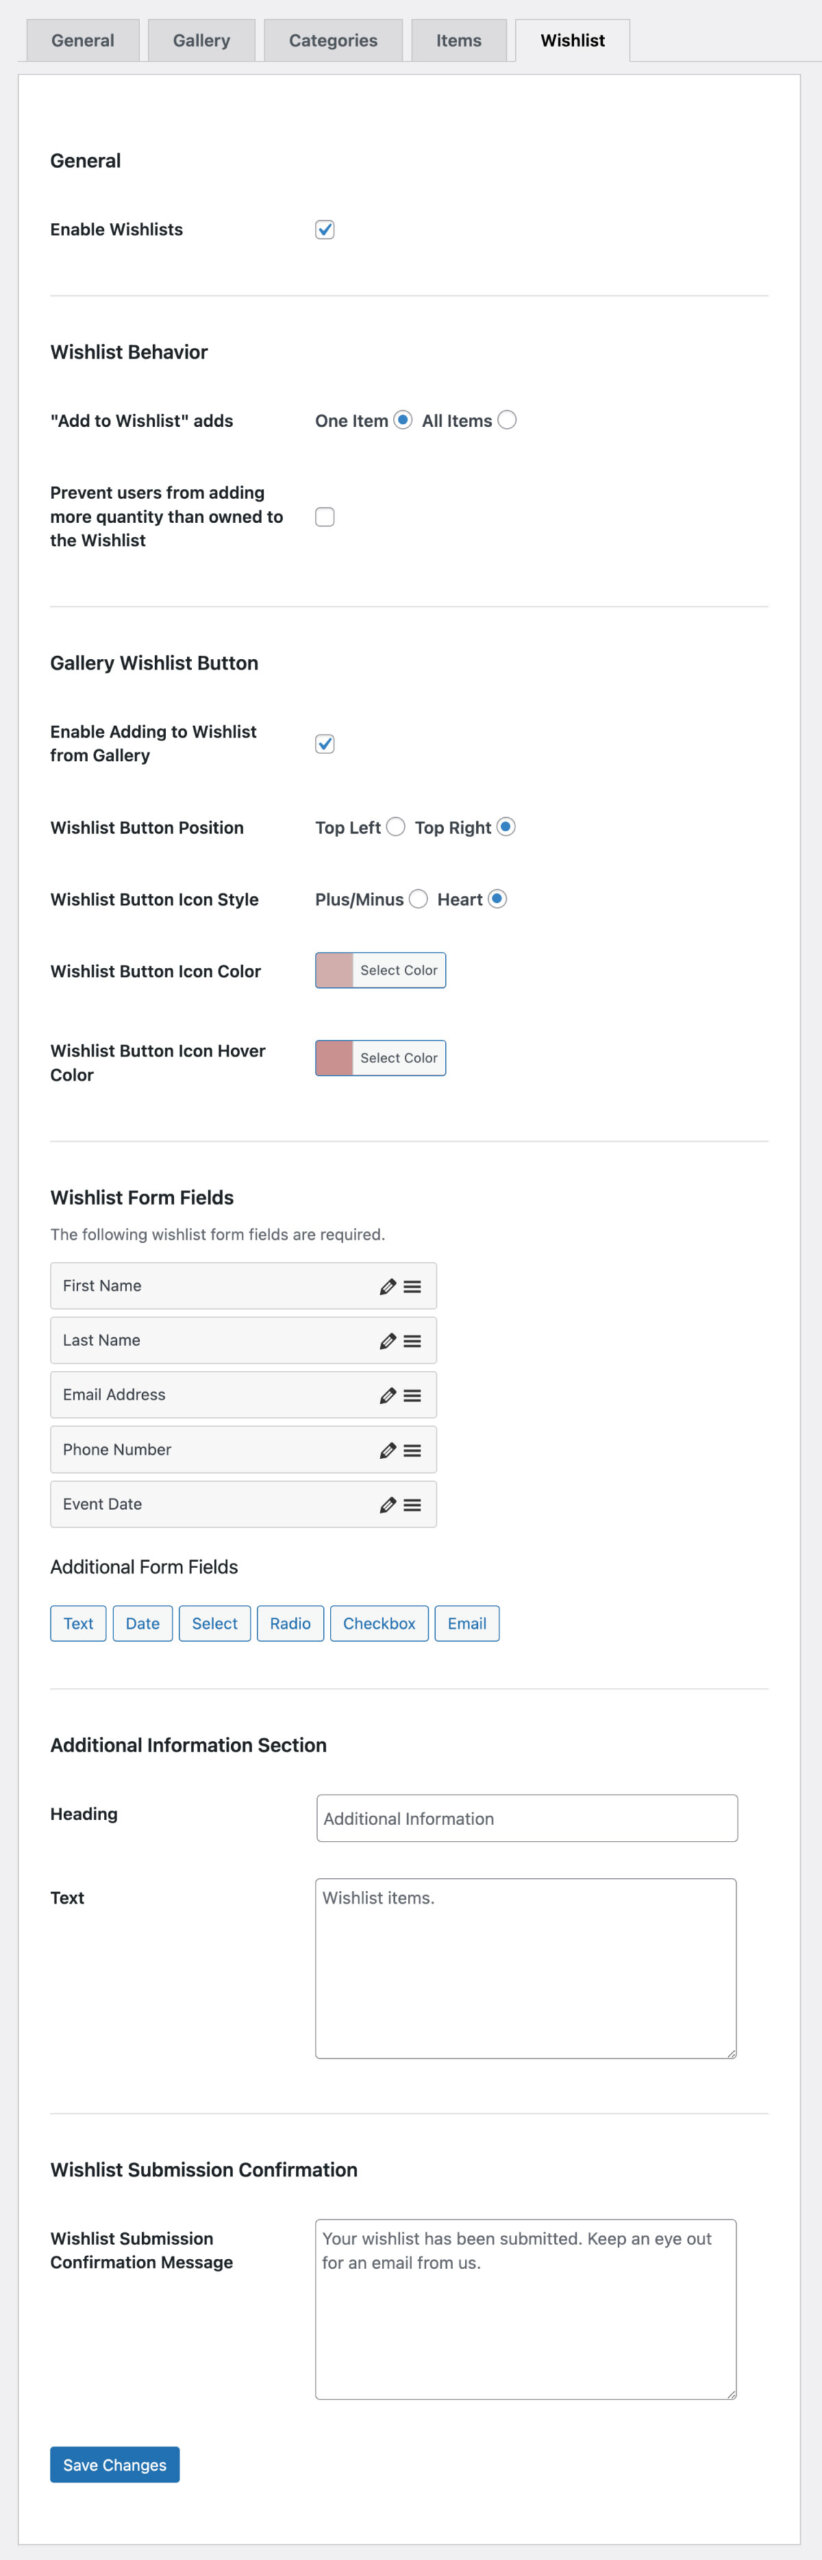
General – Activate or Deactivate the Wishlist functionality using this check box.
Wishlist Behavior – Decide how Wishlists should handle the quantity of Items on a Wishlist. Choose if the “Add to Wishlist” button adds “One” or “All” quantity of an Item (quantity of Items can be adjusted once added to the Wishlist). Additionally, here you can prevent customers from adding more than the quantity you own to a Wishlist.
Gallery Wishlist Button – Enable and configure “Adding to Wishlist from Gallery”, choose an icon location, type, colors to use for default and hover states.
Wishlist Form Fields – This section allows you to rename and rearrange the fields that are included on the Wishlist Submit form. You can also add custom form inputs to collect a range of information (Fields Include – Text, Date, Select, Radio, Checkbox and Email).
Additional Information – This option allows you to add a block of information specific to Wishlists that will always appear alongside the submission form.
Wishlist Submission Confirmation – Customize the default message displayed after a user has completed a Wishlist submission.
Also see Customizing Templates & check out our Webinar on RW Elephant WordPress Plugin Set-up & Best Practices.